


Elaine Dixon
-
Posts
500 -
Joined
-
Last visited
Posts posted by Elaine Dixon
-
-
5) Still having problems ? (Refreshing the Orbx Scenery)
- CTD (Crash to Desktop)
- Blurriness, Scenery catch up
- Water on land
- Excessive loading times
- Scenery.cfg error
------------
The 5 Issues i have outlined above can be caused by many different situations, different computer set ups and different Add On's you have Installed.
The steps below are General steps to take and are not specific to any computer setup or any Scenery, Aircraft or Utility Add On you have Installed.
In the steps below I will Instruct you to Delete 5 generated files \ folders. These are called "generated" for the reason being if you delete one of these files \ folders they will generate again when you launch Prepar3D as Default
Sometimes these files become corrupt and can cause these Issues outlined above
I will delete these 5 generated files \ folders. I will then launch Prepar3D and confirm my issue has now been resolved, Last I will then add my FTX Orbx Scenery back in with one quick step
I will go through this process with you step by step
-----------------------------------------------------------------
Please Note:
One of the files I will deleting is the scenery.cfg file, this will disable all your scenery Add On's.
If you have other scenery Add On's Installed (Non Orbx) you will need to either add this Scenery back through the Prepar3D Scenery library or run the Add On Installer again.
This will not effect Orbx Scenery as the FTX Central control Panel will automatically add the Orbx entries back again when we are finished.
--------------
Follow the steps in this Order
Deleting the 5 Generated files \ folders
The following generated files and folders i will delete are......,
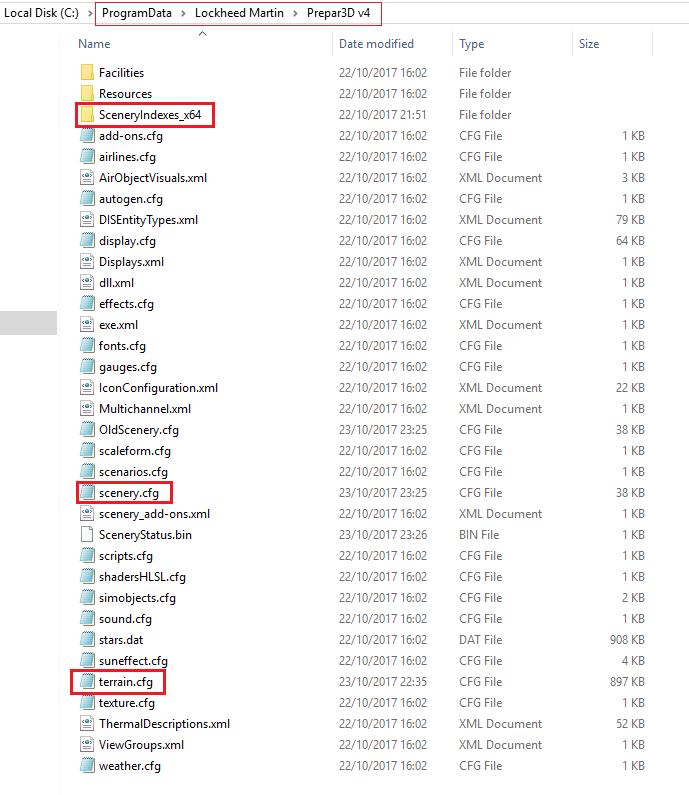
1) Prepar3D.cfg file. 2) Shaders folder. 3) SceneryIndexes_x64 folder. 4) terrain.cfg file. 5) Scenery.cfg file
Copy the below 3 set's of Tex and Paste them into your Windows search bar, One by One and click on the result, this will bring you directly to the correct locations
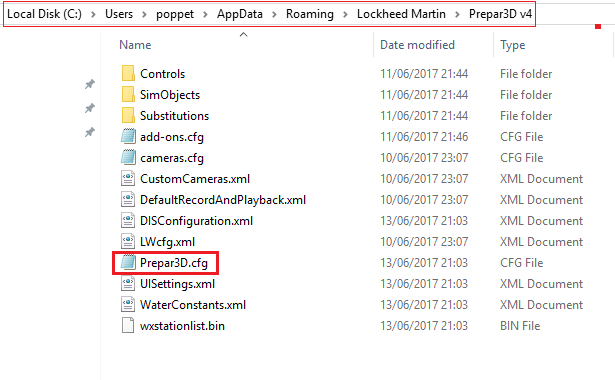
Right click and Delete the Prepar3D.cfg file For an Image of this file Click here
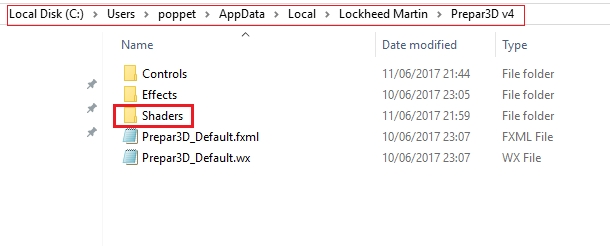
%APPDATA%\Lockheed Martin\Prepar3D v4Right Click and Delete the Shaders folder For an Image of this folder Click here
%LOCALAPPDATA%\Lockheed Martin\Prepar3D v4Right click and Delete the SceneryIndexes_x64 folder, the scenery.cfg and the terrain.cfg file For an Image of these Click here
%PROGRAMDATA%\Lockheed Martin\Prepar3D v4After you have deleted the 5 outlined files and folders Launch Prepar3D to the Scenario screen (first screen) and then Close down Prepar3D
By launching Prepar3D these files and folders will generate again as default
-------------------
Activating the FTX Orbx Scenery
By simply Launching the FTX Central Control Panel this action alone will Activate all of your Orbx Scenery again
Launch FTX Central and wait until you see a message on the bottom left of the screen "Activating Orbx scenery" this normally takes about 10 \ 15 seconds
You can now Close FTX Central

---------------------------
After you have completed the above steps Launch Prepar3D and test to see if your Issue has now been resolved
Additional Notes:
- It is required that after you delete the 5 files and folders you need to launch and close Prepar3D before you launch FTX Central
- By deleting the Prepar3D.cfg file you will need to adjust your graphic \ scenery settings again to your preference via Prepar3D > Options
- When you launch Prepar3D your Shaders will take between 10 seconds and 2 minutes to rebuild again, depending on your computer system
Back to the INDEX Click here
-
4) Problems with Scenery anomalies
- Correct Scenery order for Orbx
- Elevation Issues, Black Water
- Disabling non compatible Scenery
- Tree colors are different
- Inverted \ vertical waves
- Reinstalling the Orbx Libraries
-----------
First: If you are experiencing Issues with Scenery anomalies your first step is to Insure you have applied the Orbx Libraries updates in the FTX Central control panel.
Launch FTX Central you will notified with a little blue box on the bottom left of the control panel if an update is available
Click on this to Update

Also Insure you apply any updates to FTX Central and the Scenery have currently Installed, FTX Central will notify you of these updates
After you have applied any updates that are available, Launch Prepar3D and test to see if this step has resolved your Issue
-------------------------------------
If you are still experiencing Issues with Scenery anomalies ?
I will now go through some steps with you below
---------
- Correct Scenery order for Orbx
Note: All of Your 3rd party Airports, Scenery and Photo Scenery (Non Orbx) should be Above the FTX entries
We will now take a look at my Prepar3D Scenery Library via Prepar3D > World > Scenery Library
As you can see from the Image below the Priority in my Scenery Library is Wrong, we will need to change this

Launch FTX Central and click Settings (Bottom left) This is this FTX Central Control Panel
Here we can Configure Library Insertion Points and other needed duties
Follow the steps below...............

I will now move my 4 Add On Scenery's above the FTX entries using the Library Insertion Points tool.
Click the little tab on the right for FTX entries should be Inserted below
Scroll down to Your last Add On Scenery in the menu and Click it, In my case its "Mega Airport Dublin"

If you have any Orbx OpenLC Products Installed ? Follow the steps below.............
Using the Library Insertion Point tool we will now move the OpenLC entries below the FTX entries
Click the little tab on the right for OpenLC entries should be Inserted below and click FTX

When you have completed this step Insure you click Save before you move on

Still in FTX Central, Scroll down to Tools we will now Force a re-migration on your unified Iclookup
Click Force Migration another box will appear, Click Start Migration the process will shortly finish

Moving down the menu is the Clear Temp button
By clicking this Option it deletes any unfinished Orbx downloads that might be causing FTX Central to malfunction.
Simply click the button Clear Temp, you will not get any notification

Now launch Prepar3D and confirm your Scenery library has now been set correct

Here is a more detailed look as to what your Scenery library will look like if you have these Scenery Add On's

Additional Notes:
- For more Information regarding FTX Orbx Scenery order please see the Images at the link below
https://orbxsystems.com/forum/topic/108487-tongass-x-and-ftx/?do=findComment&comment=975652
------------------------------------------------------------------------
- Elevation Issues and Black Water Issues
Elevation Issues..........
If you have FTX Global Vector Installed Run the AEC tool (Airport Corrections Elevation)
This tool will automatically scan your scenery.cfg and Identify all add on's that will likely cause conflicts with FTX Vector. Airport elevations effected by this will be automatically disabled
Launch this Tool by clicking the Configure button

Note: It is recommended to run the AEC Tool after Installing, uninstalling, activating or deactivating your add on Scenery
Navigate to the Airport Elevations Corrections Tab at the top and now Click Run Auto-Configuration

The Auto-Configuration process will shortly finish and you will be presented with a message reminding you to click Apply to submit the changes
1 Click Ok 2 Click Apply (Important)

Additional Notes:
When you run the Vector AEC Tool any Manual changes you have made to airport elevations will be over written, and you'll have to make these manual changes again.
An example of this is FTX Orbx KPSP, which requires the user to manually disable its AEC
---------------------------------
Black Water Issues.............
The water does freeze in winter but in other seasons this setting can causes this Black Water effect, So we will now Disable this option
Click the Water Features tab at the top, Un-Tick this option and Click Apply

If you have FTX Australia Installed click Settings Tick the box and click Apply

------------------------------------------------------------------------
- Disabling non compatible Scenery Add On's
Note: It is recommended to only Install Officially compatible Prepar3D v4 Scenery Add On's, Check with the Vendor and Insure the Scenery is compatible before you purchase and Install
If you are experiencing Issues with Scenery anomalies Insure you Disable any non compatible Scenery you may have Installed
Disable each of the non compatible Scenery One by One and then test to see if this specific Scenery Add On is causing you these Scenery anomalies. When you find the problematic Add On Insure you use the Delete option to remove this Scenery.
As you can see below I have found a Scenery that is Not compatible with Prepar3D v4, So i will Disable this Scenery and then test, If this is the problem, I will Delete this Add On

Additional Notes:
Some non compatible Scenery Add Ons will work but may require manual moving and editing of files. It will be a case by case basis and should be only carried out if you have experience in this area
------------------------------------------------------------------------
- Tree colours are different
The Images below and the "different tree colour effect" is a typical scenario using Orbx Scenery with also the option for Speed Trees ticked in the Prepar3D user Interface
By default all autogen tress are now the 3D Speed-tree models.

You can disable Speed Trees via Prepar3D > Options > World and Un-Tick the box for Dynamic 3D Autogen Vegetation
Note: You will need to restart Prepar3D for this to take effect

------------------------------------------------------------------------
- Inverted \ vertical waves
If you are seeing this effect with the Waves, You will need to reinstall the Orbx Libraries, follow the steps below

------------------------------------------------------------------------
- Reinstalling the Orbx Libraries
To Reinstall the "Orbx Libraries" Delete the version text file located below
Prepar3D v4 ► ORBX ► User Documents ► Versions ► FTX_AA_ORBXLIBS.TXT
Right click and Delete this file

Launch the FTX Central control panel, this action will prompt you to reinstall\update Orbx Libraries
Click the blue box (Bottom left corner)
Back to the INDEX Click here
-
Hello Ticker
Below is a Tutorial you may find helpful, you will find Installing Prepar3D at INDEX 1. I have also covered some other guides for future reference
-
3) The Migration Troubleshooter.exe (Missing files)
By running the Migration Troubleshooter.exe tool from the location below, this will check and verify the Orbx files
Prepar3D v4 ► ORBX ► Migration Troubleshooter.exe

As you can see below the Migration Troubleshooter will show you the Scenery you have currently Installed and have been verified
If you have "Missing Files" you will need to reinstalled this scenery again, In this case I will need to reinstall the region of Wales

To reinstall any Scenery you need navigate to the location below
Prepar3D v4 ► ORBX ► User Documents ► Versions
Here we have all our Installed Orbx Scenery in version TXT files. By deleting one of these files it Will Not uninstall the product but it will just tell the FTX Central control panel that this specific scenery is not Installed
I will now delete the Wales TXT file as the Migration Troubleshooter indicated "Missing Files"
Right click and Delete the file you need to reinstall, in my case its FTX_EU_WLS.TXT

Launch the FTX Central control panel, Navigate to the Scenery you need to Install again and click Install

When you the Install process has completed, Run the Migration Troubleshooter.exe tool again
As you can below all my files have been checked and are now verified as good

Please note: If you have already done this process and you are still seeing "Missing Files" follow the steps below
We will now Force a Migration through the FTX Central Control panel, Launch FTX Central and click Settings and navigate down to Tools
Click Force Migration

This box will appear, Click Start Migration the process will shortly finish

When you have completed these steps run the Migration Troubleshooter.exe tool again to Insure this has been successful
Back to the INDEX Click here
-
 1
1
-
-
2) FTX Orbx Scenery and Reinstalling Prepar3D
You can successfully Uninstall Prepar3D and then reinstall again and keep all your FTX Orbx Scenery in place and working by just completing a couple of small steps
Please Note:
For this process to work you must Install Prepar3D back into the same folder as your previous Install, This is the folder your FTX Orbx scenery resides in.
Do not delete your Core Prepar3D folder after you uninstall Prepar3D, This is the location the "Orbx folder" resides in. If you delete this folder you will lose all your Orbx Scenery
You will also notice after you uninstall Prepar3D as well as the Orbx folder you will have many other folders like effects, weather, textures, sounds, scenery and so on in the Core prepar3D folder, This is Normal. These folders have all the Orbx files we need to complete this process
----------------------------------------------------
After you Uninstall and then reinstall Prepar3D Insure you Launch and Activate Prepar3D to insure you have no Issues at this stage.
When you are happy, Close Prepar3D and follow the steps below
2 Required steps:
I) Launch the FTX Central Control Panel and wait 10 \ 15 seconds, this action alone will reconfigure the Auotgen files and activate your Orbx scenery
II) If you have Orbx Global Base and FTX Trees both of these will need to be reinstalled by following the Scenery steps outlined above
3 Precautionary steps
III) Force an update of the Orbx Libraries by following the steps outlined above (A)
IV) Force a Migration by following the steps outlined above (B)
V) Run the Migration Troubleshooter by following the steps outlined above (C)
Additional Notes:
- If you see a message "Missing files" when you run the Migration Troubleshooter tool please see the Topic below
Back to the INDEX Click here
-
1) FTX Orbx Scenery and Updating Prepar3D
Prepar3D is made up of 3 component Installers, Client, Content and Scenery, For a Guide to Update Prepar3D Click here
Updating each component will require you to take different actions, Some of these are Required actions and some are just Precautionary actions
----------------------------------------------------------
Client: Updating the Client component will have no effect on your Orbx Scenery.
Just launch the FTX Central Control Panel for 10 \ 15 seconds, FTX Central will check and verify the Orbx files.
Additional Notes:
- When you launch the FTX Central Control panel always Insure you Apply all available Updates to FTX Central, Orbx Libraries and any other Scenery you have Installed. FTX Central will notify you of these updates
-------------------
Content: Updating the Content component you will need to take 1 Required step
Required: After updating the Content component you need to simply launch the FTX Central control Panel
This action alone will configure the Prepar3D autogen files for Orbx use. Launch FTX Central and wait 10 \ 15 seconds and that's it.
Precautionary: The steps below A, B and C are precautionary steps which can be carried out if you are experiencing Issues after updating the Content component
(A) Orbx Libraries: Force an update of the "Orbx Libraries" by Deleting the version text file located below
Prepar3D v4 ► ORBX ► User Documents ► Versions ► FTX_AA_ORBXLIBS.TXT
Right click and Delete this file
Launch the FTX Central control panel, this action will prompt you to reinstall\update Orbx Libraries
Click the blue box (Bottom left corner)
-----------------
(B) Force a Migration: In FTX Central click Settings navigate down to Tools and click Force Migration
Another box will appear click Start Migration, the process will shortly finish

After this step you can Close FTX Central
-----------------
(C) Migration Troubleshooter: Run the Migration Troubleshooter.exe tool to Insure you have no "Missing files"
Prepar3D v4 ► ORBX ► Troubleshooter ► Migration Troubleshooter.exe

Additional Notes:
- If you see a message "Missing files" when you run the Migration Troubleshooter tool please see INDEX 3.3
- By launching the FTX Control Panel this action alone will reconfigure your Autogen files and Activate your Orbx scenery again
-----------------
Scenery: Updating the Scenery component will Require you to take 2 steps
Required: If you have Orbx Global Base and or FTX Trees these 2 Scenery's will need to be reinstalled again
Follow the steps in this order.............
Navigate to the location below and Delete the 2 outlined version TXT files
Prepar3D v4 ► ORBX ► User Documents ► Versions ► FTX_GLOBAL_BASE_PACK.TXT + FTX_TREES_HD.TXT

Launch the FTX Central control panel and navigate to Global Base and or FTX Trees and click Install
Precautionary: Carry out steps A,B and C from above. A: Force an Orbx libraries update. B: Force a Migration. C: Run the Migration Troubleshooter.exe
Additional Notes:
- If you see a message "Missing files" when you run the Migration Troubleshooter please see INDEX 3.3
- Launch the FTX Central control after updating the Scenery component, this action alone will check and verify the Orbx files
Back to the INDEX Click here
-
 2
2
-
4) Problems Activating Prepar3D
If you are experiencing problems Activating Prepar3D please go through these activation error codes first as they may pertain your situation
I have also Included steps with Images to Activate Prepar3D from Another Computer If you have installed your software on a computer without an internet connection
----------------------
INDEX1) Activation Error Codes
2) Activating Prepar3D from Another Computer
-----------------------------------------
1) Activation Error CodesFrequently asked Questions.......
How can I transfer my license to another computer ?Before making any major changes to your computer (hardware swaps, operating system changes, etc.,) please Uninstall\Deactivate Prepar3D first to avoid activation delays
Note: Clearing your registry will not release your activation. If you still get error 5013, please email licensing@prepar3d.com with your License ID and a brief explanation.
---------
Why can I no longer activate after I have reinstalled Prepar3D, updated software, updated hardware, or installed Prepar3D on a new machine? I am getting error 5013 when trying to install. What do I need to do ?
Depending on the license you have, it is likely that you have reached the limited number of activations for your specific license. While the licensing software does recognize that the installs are being done on the same computer, if enough of the computer’s information changes (operating system, external hardware, graphics cards, etc.), it will flag your setup as a different computer. If you need an additional activation, because of a hardware change or you are moving the license to a new computer, please e-mail licensing@prepar3d.com with your License ID and a very brief explanation of the reason you need your license reactivated. Your request will be fulfilled within two business days.
---------
When I try to activate Prepar3D, I get error 5022. What should I do ?
Error 5022 occurs when your system time does not match our server’s time. In order to activate Prepar3D, you will need to adjust your system time to the correct time for your region.
---------
When I go to launch or activate Prepar3D I am getting error 309 or 306. What do I need to do ?
This error typically occurs if you have modified your system clock. If you have modified your system clock forward/backward it could be causing this failure. Please check and make sure your system clock is correct. This may require you to restore your computer to a previous restore point to fix the issue.
---------
When I go to activate Prepar3D, I keep getting error 5012 or 5010. What do I need to do ?
That error occurs when trying to activate a copy of Prepar3D with an incompatible license type. For example, if you try to activate a Professional version of Prepar3D, but you use an Academic version license ID. You will need to make sure you install the correct version of Prepar3D and use the correct license for that version.
---------
When I go to activate Prepar3D, I keep getting error 5008. What is wrong ?
The License ID or the Password cannot be validated. Likely this is because you are entering the wrong activation password. Make sure you are using the activation password that is contained in your invoice email and not your Prepar3D.com forum account password.
-------------------------------------------
2) Activating Prepar3D from Another Computer
If you have installed your software on a computer without an internet connection you may activate by using a second computer that has an internet connection.
This method will result in an instant activation and does not require contacting support. Activating using this method will not allow you to deactivate/reactivate and is only recommended when it is not possible to connect the installation computer to the internet.
Launch Prepar3D, In the Prepar3D Activation Options click "Activate from Another Computer"
Enter your License ID and Password, Click Continue. You will find these credentials in your purchase email Invoice

Click Save Request

You will now be prompted to save this file
Select a path to save the offline activation file. You should save this file to a USB drive or any removable media device.
Click Save, The Request file will save to the path you have selected, In the below example I saved this file to my Desktop

Click Ok, the Activation Request file has been successfully saved

I now have a Request Activation Icon on my Desktop and ready for the next step

Insert a USB drive or any removable media device and send this Activation Request file to this drive

Right click on the Activation Request Icon and Send to your USB Device

When completed safely plug out the USB Device
------------------------------
A Computer with an Internet connection is now required
Plug the USB device into a computer with Internet access If prompted to download ActiveX control, Click the Download button
Double left click on the Activation Request file to open

With the file now open Click Download, A response.xml file will download to your computer

You can now send this file to your USB drive or any removable media device
Navigate to your PC downloads, Right click on response.xml file Send to your USB device

When completed safely plug out the USB Device
------------------------------
On the Prepar3D Installation Computer
Plug the USB device back into your Prepar3D Installation Computer. You can either copy the response.xml file to your computer or load it in directly from the USB drive
Launch Prepar3D and click "Activate from Another Computer"

Enter your License ID and Password again and click Continue

1 At the next window click Load Response
2 A search box will appear, Navigate to your USB Device or Desktop and Click on the response.xml to load

Activation has been successful, Click Ok, Prepar3D will now automatically launch

Back to the INDEX Click here
-
3) Installing Problems, Prepar3D will not Install
Note: If your just looking for a basic guide to install Prepar3D please see this link to Download and Install
--------
If you are experiencing problems Installing Prepar3D please go through these steps to help resolve this
I have Included a checklist to confirm before you run the setup_Prepar3D.exe Installer
I have also Included steps to manually Install Prepar3D if running the setup_Prepar3D.exe fails to Install successfully
Please Note:
* If you already have Prepar3D Installed and you wish to reinstall the same version you must Uninstall/Deactivate first before you reinstall again
* Install the newest available version of your v3 or v4, Support will not be provided for legacy versions.
* Go though the Prepar3D System Requirements and confirm your computer meets at least the minimum requirements
----------------------------------------------------------
INDEX
I) Steps to confirm before you Install Prepar3D
II) Installing Prepar3D
------
III) Problems
------
IV) Manually Installing Prepar3D
-----------------------------------------l) Steps to confirm before you Install Prepar3D
Please check and confirm these 7 steps before you you Install Prepar3D
Step 1
PC Admin: Are you logged onto your windows user account as administrator ?
If not log in now as administrator Or Create an administrator user account and then log in
---------
Step 2
Update: Is your Windows Operating system up to date ? Run the Windows Updates and Insure you Install all Important updates available.
---------
Step 3
Hard drive space: Do you have the required hard drive space to Install Prepar3D ?
You will need at least 40 gig of hard drive space to Install Prepar3D
* 13 gig of this hard drive space will be needed on your Operating system for the repair Installers.
27 gig of hard drive space is required to Install the Core prepar3D folder
In total you will need at least 40 gig of hard drive to Install Prepar3D
---------
Step 4
Good Download: Did you confirm the MD5 Checksum on the Prepar3D download ?
This is an Integrity test and will confirm if the download is good or not. If your download is corrupt or Incomplete Prepar3D will not Install.
You can do this by confirming the MD5 Checksum on the download.
For steps to confirm the MD5 checksum on the Prepar3D download folder please see This link
---------
Step 5
Antivirus Software: Did you Disable your Antivirus Software and Firewall ?
Insure you temporarily Disable both your Antivirus Software and the Firewall as they may disrupt the Install process
Also, Insure your Antivirus Software is still not running in the background after you disable it, You can check this by opening the Task Manager and manually closing them down
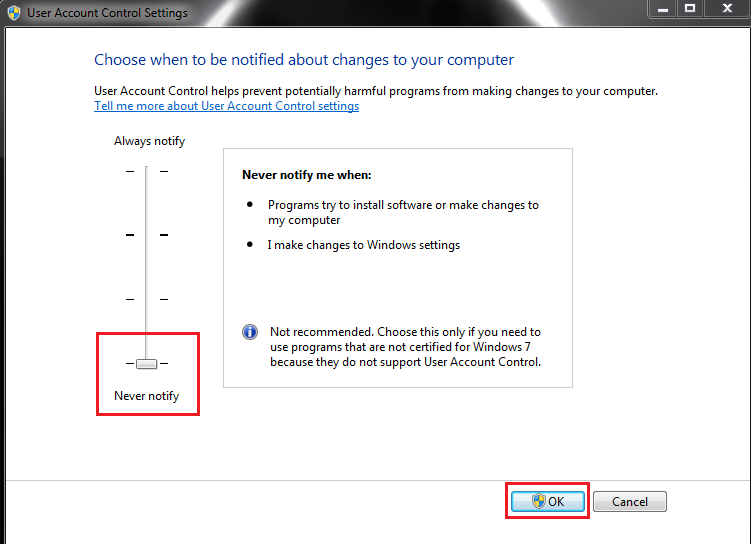
Disable your UAC User Account Control from possibly disrupting the Install Process. Type UAC in your windows search bar. Click Never notify and Click Ok
---------
Step 6
Task manager: Close any programs running in the background that may disrupt the Install process, Programs like Team_Viewer, MSI Afterburner, Evga Precision and so on.
Open the Task Manager and close any of these types of programs down from running in the background
---------
Step 7
USB Devices: Unplug all USB Devices from your computer Including extra monitors and Sound cards (except keyboard and mouse)
If the Install process is successful you can then plug them back in again
--------------------------------------------------------
ll) Installing Prepar3D
After you check and confirm the above 7 steps you are now ready to run the Installer again
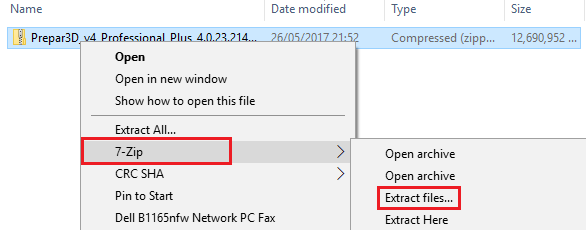
You need to first Extract the Zipped folder Before you run the Installer. Use an extract tool like 7zip to extract the Zipped folder
Note: If you encounter error messages when extracting the zipped folder please see This link

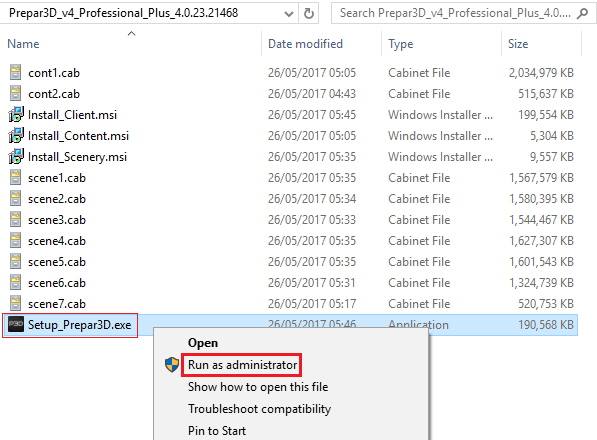
After you extract the zipped folder Run the Prepar3D Installer as administrator.
Right click on Setup_Prepar3D.exe and Run as administrator (Important)

You will see this message when the Install process has completed.
Restart your computer, You are now ready to Activate Prepar3D

To activate Prepar3D, Right click on the Prepar3D Icon and run as administrator, follow the prompted steps to activate

------------------------------------------------------------------------------
III) Problems
Additional Steps to check
If you are still experiencing problems Installing Prepar3D try these 3 additional steps one by one
1) Special Characters Remove any Special Characters in your Windows User name, Characters like /\[]":;|<>+=,?*
Also insure you are Installing the most recent version available for your Prepar3D v3 or v4
-------------
2) System File Checker: The System File Checker is a utility in Windows that allows users to scan for corruptions in Windows system files and restore corrupted files
For a guide to use this tool Click here
-------------
3) Corrupt user account: Its possible you may have a corrupt windows user account
Create another Windows User Account with Admin privileges, Sign into this new account and then proceed with the Install process
--------------------------------------------------------
Error messages during the Install process
These are just some of the error messages you may see during the Install process
Hash Value not correct: If you are receiving a message during the Install process "The hash Value is not correct" Or "File not found"
You will need to re download or download Individual files and then confirm the MD5 Checksum on the download folder to Insure you have a good download, Click here for Instructions
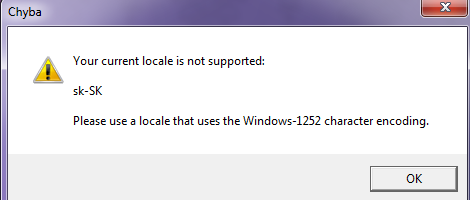
-------------System Locale: If you are receiving a message during the Install process Your current Locale is not supported That message is to let you know that you might experience issues on a non-English type computer.
If you do have Issues, Change your system location to English (US)
For steps to change your System Locale Click here
-------------Failed to copy resource: If you are receiving a message during the Install process Failed to copy resource Try the following steps
1) Insure you have logged onto your PC as administrator Or Create an administrator account
2) Remove any Special Characters in your Windows User name, Characters like /\[]":;|<>+=,?*
3) Run a Repair on the Client or the setup_Prepar3D.exe (Depending on which way you were Installing)
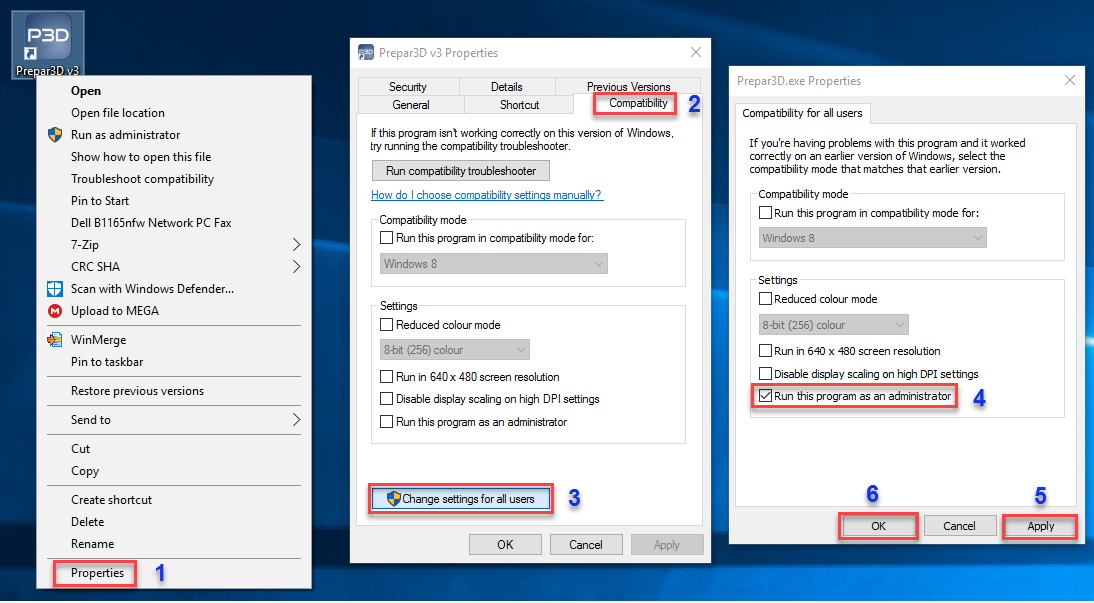
If the above steps does not resolve your Issue Create another Windows User Account with Admin privileges, Sign into this new account and launch Prepar3D as Administrator Like this
-------------
Could Not write Value: If you are receiving a message during the Install process Could not write value Complete to KeyThis message means there is a system permissions Issue on your system
Click Ignore the Install process will finish Ok and you will more then likely Not have any problems with this
-------------
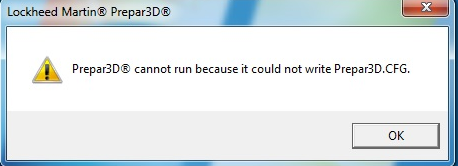
Could not write Prepar3D.cfg: If you are receiving a message during the Install process Could not write Prepar3D.cfg this means due to Read and write permission Issue the Installer could not access and write to the generated folders in the C Drive (Operating system)The Installation will finish Ok but you will need to change some settings, follow the steps below to help resolve this
1) Insure you are logged into your PC as administrator, If not Create an Admin account and sign in
2) Disable your UAC User Account Control and Restart your computer
3) Check and confirm you have full Read and Write permissions on your C Drive and the Prepar3D.exe
4) Set up Prepar3D to run as Administrator and now launch it
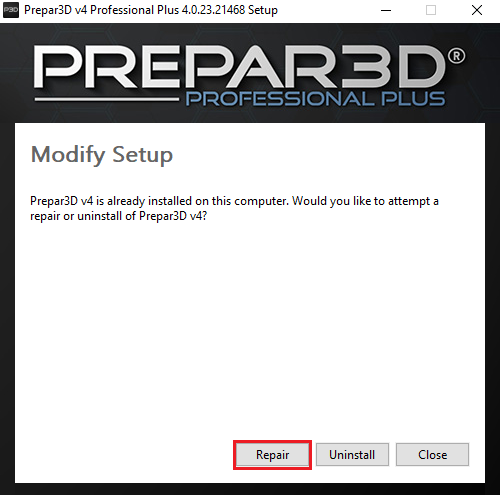
If you are still seeing this message keep the above steps in place and run a Repair on Prepar3D
Run the Installer again and click Repair
If the above steps does not resolve your Issue Create another Windows User Account with Admin privileges, Sign into this new account and launch Prepar3D as Administrator
-------------------------------------------For all other error codes like, 0x80070643, 0xfffffff7, 0x800705aa, 0x800713ec, 0x80070005
Go through the checklist below again as you may of missed a step
Checklist, Before you Install Prepar3D.......
* Are you logged onto your PC as administrator ?
* Is your Windows Operating system up to date ?
* Do you have the required hard drive space to Install Prepar3D ? 40 gig in total
* Do you have more them 13 gig of free hard drive space on your Operating system ?
*Did you confirm the MD5 Checksum on the Prepar3D download folder ?
* Did you Disable all Antivirus Software and Firewalls ? Also close them down in the Task Manager
* Did you close programs like Team_Viewer, MSI Afterburner and evga precision in the Task Manager ?
* Did you unplug all Unplug all USB Devices from your computer, except keyboard and mouse ?
* Did you Extract the Zipped folder ?
* Did you run the Prepar3D Installer as administrator ?
Check and confirm the above points and then run the Setup_Prepar3D.exe again as Administrator
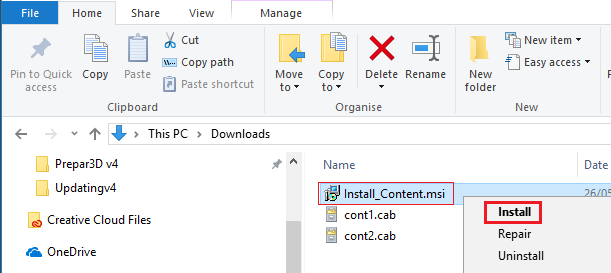
IV) Manually Installing Prepar3D
* Installing Prepar3D manually should only be done if running the Setup_prepar3D.exe fails to Install successfully
This process will require you to Install the Prepar3D Component Installers and the Prerequisite Installers Individually
When you have completed this you will have a full Install of Prepar3D
-------
INDEX
1) Installing the Prepar3D Components Individually
2) Installing the Prerequisite Installers
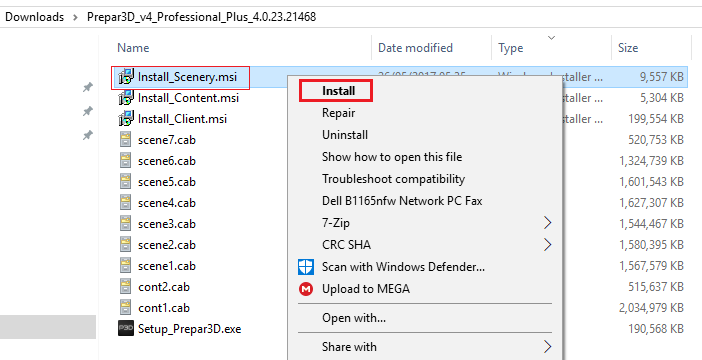
---------------------------------------1) Installing the Prepar3D components Individually
First Extract the Zipped folder
You must Install the Client component first
Right click on Install_Client.msi and click Install, Go though the prompted steps to Install the Client

Next: Right click on Install_Content.msi and click Install, The process will shortly finish

Last: Right click on Install_Scenery.msi and click Install, The process will shortly finish

With all 3 components Installed you are now ready to run the prerequisite Installers
-------------------------
2) Installing the prerequisite Installers
Microsoft Visuals
For Prepar3D v4 Microsoft Visuals 2015 is required. For Prepar3D v3 Microsoft Visuals 2013 is required
Prepar3D v4: Download Microsoft Visuals 2015 x86 & x64 Run the Installers as administrator, Restart your computer
Prepar3D v3: Download Microsoft Visuals 2013 x86 & x64 Run the Installers as administrator, Restart your computer
---------
Microsoft .NET FrameworkFor Prepar3D v4 & v3
Download Microsoft .NET Framework 4.6.2 , Run the Installer as administrator, Restart your computer
---------
Microsoft Core XML (MSXML) 6.0Download msxmI6_x86.msi, Right click and Install It, The process will shortly finish.
More then likely you already have this prerequisite on your computer
---------
DirectX End-User Runtimes (June 2010)Before you begin...
Create and Name a new folder anywhere on your PC, For example I created a new folder in my Documents calling it DirectX
I will point the Installer to this folder and extract the files here
1) Download DirectX End-User Runtimes (June 2010)2) Navigate to your downloads and right click on directx_Jun2010_redist.exe and run as administrator
3) Click Yes to the terms and conditions
4) Click Browse and navigate to your new folder, Click ok. The Installer will extract the files here
5) Open your new folder, Scroll down and right click on DXSETUP.EXE and run as administrator
After the Install process has completed Restart your computerYou are now ready to launch and Activate Prepar3D
Back to the INDEX Click here
-
2) Downloading Problems, Install errors, Confirming the MD5 Checksum
If you are experiencing Install errors and broken downloads please go through these steps to help resolve this
Note: To Download and Install Prepar3D you will need at least 40 gig of hard drive space
I will download Prepar3D and then use a MD5 checksum tool to confirm if I have a good download
----------------------------
INDEX
1) Downloading Prepar3D (Download Manager)
- Checking the MD5 Checksum (Confirming a good download)
-------
2) Problems, The MD5 Checksum is Not matching
- Downloading the files Individually
- Checking the MD5 Checksum on the file
-------
3) Error message when Installing Prepar3D
-------
4) Prepar3D will not download ( I have tried everything )
- Additional steps to check and take
----------------------------------------------------
Some pre checks before you download Prepar3D...........
* Antivirus Software: Check your Antivirus Software or Firewall is not set up to block downloads
* Hard Drive Space: Insure you have enough hard drive space to download and install Prepar3D, at least 40 gig
* Internet Allowance: Check and confirm you have sufficient Internet data Allowance, (at least 13 gig for the download)
1) Downloading Prepar3D (Download Manager)
For best results use a Download Manager to download Prepar3D (Important) They are free to use and will allow you the ability to resume a download if your Internet connection is disrupted.
After your download has completed you can now Confirm the MD5 checksum (hash value) on your download against the MD5 Checksum outlined in the Prepar3D downloads page to Insure you have a good download
I use the MD5 Checksum Utility tool to confirm the correct hash value on my downloads, This tool is free and easy to use.
Click the link provided and follow the steps below MD5 Checksum Utility
- Checking the MD5 Checksum (Confirming a good download)
Step 1 (of 3)Tick the Box for MD5. 1 Click Browse and navigate to your Zipped Prepar3D v4 folder
2 Double left click on the Zipped Prepar3D folder to add into the File box

Step 2
1 Sign into your Prepar3D downloads page, Right click and Copy the Prepar3D v4 MD5 Checksum number
2 Paste this number into the Hash box

Step 3
1 Click Verify, The Checksum tool will now calculate both sets of numbers
2 The MD5 Hash has matched, I have a good download, I am now ready to Extract the Zipped folder and Install Prepar3D

If you have confirmed the MD5 Checksum You are now ready to Extract the Zipped folder and Install Prepar3D
For a guide to Install Prepar3D Click here
------------------------------
2) Problems, The MD5 Checksum is Not matching
If the MD5 Checksum does not match this means you have an Incomplete download (bad download)

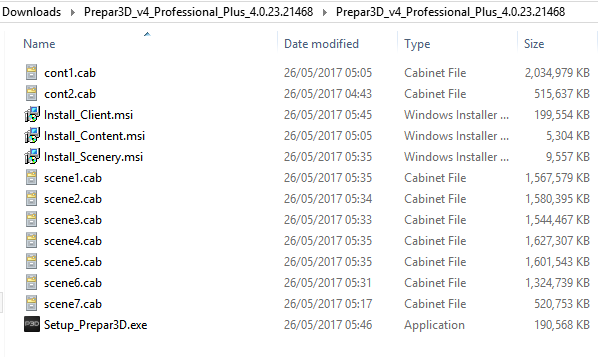
We will now use the 7zip tool to Extract the Zipped folder as this may give us some clues as to which files we may need to download again.
Please Note: The following steps below is only an example, you may need to download different files
Right click on the Prepar3D Zipped folder and Extract the files
As you can see from the Image there is an error with the Cont1.cab file, I will need to download this file again.
We can download the additional files we need Individually from your Prepar3D downloads

First, Delete the Cont1.cab file, This file is Incomplete (bad download)

Next, Sign into your Prepar3D downloads, Click the + to Expand the Component Files
Click on the cont1.cab file to download, Insure you use a Download Manager to download this file

After the download has completed I will now confirm the MD5 Checksum on the cont1.cab file
1 Click Browse and navigate to your downloads. 2 Double left Click on the cont1.cab file to add into the File box

1 Navigate back to your Prepar3D downloads, Right click and Copy the MD5 Checksum number of the Cont1.cab file
2 Paste this number into the Hash box. 3 As you can from the Image the cont1.cab file download is good

Now Click and Drag the new cont1.cab file back into your Prepar3D v4 download folder

You are now ready to Install Prepar3D

------------------------------
3) Error message when Installing Prepar3D
If you did not Confirm the MD5 Checksum of your download you might see a message like this during the Installation process.
This message is telling me that the Prepar3D Installer can not find the scene4.cab file. I will need to download this file again

Sign into your Prepar3D downloads, Click the + to Expand the Component Files,
Here you can download any additional component files you need to complete the Installation process
Follow the exact same process as above, Download the file you need, Confirm the MD5 Checksum, Then move the file into your Prepar3D download folder and run the Prepar3D
Installer again

------------------------------
4) Prepar3D will not download ( I have tried everything )
If you are consistently getting errors and Incomplete downloads, Please try the following steps
1) Clear your web browser cache. (Select your browser from the links for a guide). Google Chrome, Mozilla FireFox and Internet Explorer
--------
2) Flush the windows DSN Caches (Domain Name System) Its possible the DSN caches has become polluted.
This process is quick and easy to complete, Follow the steps in the link provided for Windows 7, 8 and 10 Click Here
--------
3) Check and Confirm your Windows Host file is not blocking the Prepar3D download's page, Click here for Instructions and follow step 5
--------
Check your Internet Router and Modem for connectivity Issues
Download Connection: Run a Speed Test to Insure you are getting a good connection
Contact: Contact your (ISP) Internet service provider and query if there is an connection Issue on the line
Reset: Plug out the Internet Router and Modem, Wait for a minute, Plug both devices back in and test again
Wireless Driver: Update your Wireless driver on your computer
Wired connection: Try using a Wired connection
Ethernet Cable: If your using a wired connection Insure the Ethernet Cable has not become perished and worn
Firewall: Does your Internet Router have a built In Firewall ? Insure that its not blocking the Site
Firmware updates: Check the Internet Router \ Modem has had all available Firmware updates
Please Note: You can also use a Mobile Device as a Hot-Spot to download Prepar3D, Insure you have enough Mobile data allowance for this download, at least 13 gig
Back to the INDEX Click here
-
1) Unable to Purchase Prepar3D, "This Site can't be reached"
If you are trying to purchase Prepar3D and you are receiving a "This site can't be reached" message whilst in the Store page, Please go through the 5 steps below one by one to help resolve your Issue

* Please Note: You can purchase Prepar3D on any device with an Internet connection, Your activation details will be mailed to your email account
"You can purchase Prepar3D with a Visa, MasterCard, or Discover credit card. We are unable to accept PayPal payments at this time, and have no plans to accept PayPal payments in the future"
-------------------------------1) Try using a different Internet Browser to access the Store page, Maybe try Internet Explorer, Firefox or Google
--------
2) Insure the Windows system Clock and Date is set correct. Incorrect system time and date can lead to website errors, check and confirm your system Time and Date
--------
3) Check your Antivirus Software Or windows Firewall is not blocking the Store page
--------4) Flush the windows DSN Caches (Domain Name System) Its possible the DSN caches has become polluted. This process is quick and easy to complete, Follow the steps in the link provided for Windows 7, 8 and 10 Click Here
--------
5) Check your windows hosts file to Insure secure.prepar3d.com has not been blocked from accessing the Store page.
The hosts file is a computer file that is used by the operating system to map hostnames to IP addresses, Its possible your Malware or Firewall software has added a Block entry to your host file
You can check this by following the steps below.......
Type %WINDIR%\System32\Drivers\etc into your windows search bar and click on the folder to open
Quote%WINDIR%\System32\Drivers\etc
1 Type the above Tex into your windows search bar. 2 Click on the folder to open

Right click on the hosts file Open with > Notepad

We are now inside the Windows hosts file, Check and Delete any entry that refers to Prepar3D, follow the steps below
1 Delete the complete entry 127.0.0.1 secure.prepar3d.com as seen from the outlined red box. 2 Click File and Save it (Top left)

Please Note: You will need administrator privileges to successfully Delete any entries Inside the hosts File
You can also Click and Drag the hosts file to your Desktop, make the alterations and then move the hosts file back in again
After completing the above steps Click Here and test to see if this has resolved your Issue
When you have successfully purchased Prepar3D please see this link for a guide to Download and Install Prepar3D
Back to the INDEX Click here
-
3) Uninstalling\Deactivating Prepar3D v4
A Step by Step Guide to Uninstall Lockheed Martin's Prepar3D v4
By following this process you will Deactivate and Uninstall Prepar3D v4 from your Computer
Note Follow this link for a Tutorial to Uninstall/Deactivate Prepar3D v3
-----------------------------------------
INDEX
1) Uninstalling Prepar3D v4
2) Deleting the 6 Prepar3D v4 folders
-----
* Additional information
Returning Prepar3D v4 to a Default state
-----------------------------------------------------------------------------------
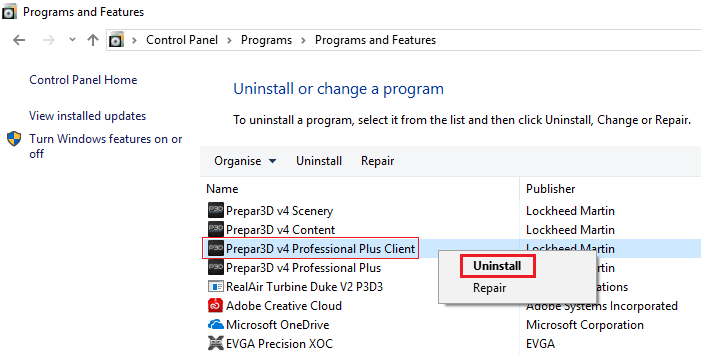
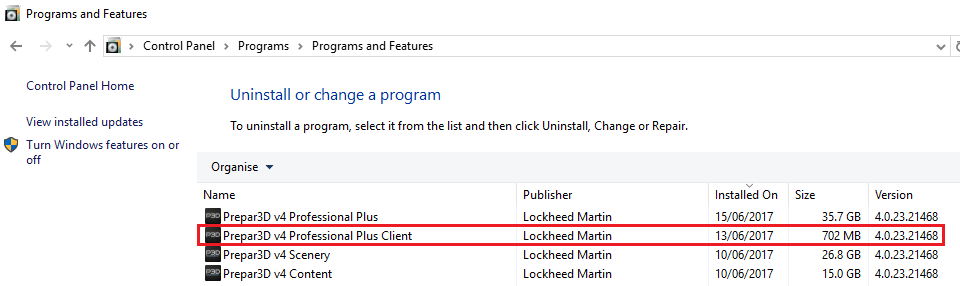
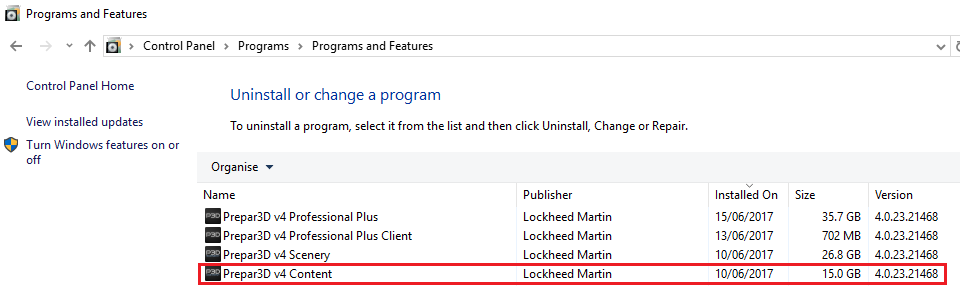
1) Uninstalling Prepar3D v4
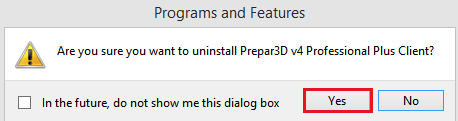
Navigate to your Control Panel "programs and features" Right Click on Prepar3D v4 Academic \ Professional Click Uninstall

The Modify Set up box will appear, Click Uninstall

After this process has completed, Click Close

Please Note: If you originally Installed Prepar3D v4 by running the component Installers Individually you will not have a Prepar3D v4 Academic \ Professional in your Control Panel
You can just Right Click on each of the components Client, Content and Scenery and Click Uninstall-----------------------------------------
2) Deleting the 6 Prepar3D v4 folders
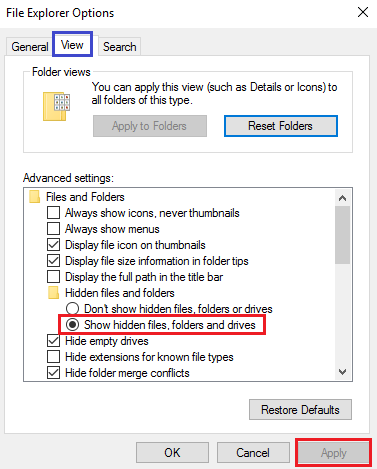
While the uninstaller removes all files that are created by the installer, it does not completely remove content that was generated during program execution. To completely uninstall Prepar3D, you must manually delete folders and files that are created during runtime.
Note: To locate these folders, Insure the box is Ticked for Show hidden files, folders and drives in File Explorer Options
For a clean Uninstall, please manually Delete the following 6 blue folders:
------------
Local Disk (C:) ► Program Files ► Lockheed Martin ► Prepar3D v4 (or the modified install location)
Documents ► Prepar3D v4 files \ Prepar3D v4 Add-ons
Local Disk (C:) ► ProgramData ► Lockheed Martin ► Prepar3D v4
Local Disk (C:) ► Users ► You ► AppData ► Roaming ► Lockheed Martin ► Prepar3D v4
Local Disk (C:) ► Users ► You ► AppData ► Local ► Lockheed Martin ► Prepar3D v4
------------
Restart your computer. You have now successfully Uninstalled and Deactivated Prepar3D v4 from your computer
You are now ready to Reinstall again
--------------------------------------------------------------------------------------------------------------------------------
--------------------------------------------------------------------------------------------------------------------------------
* Additional information, Returning Prepar3D v4 to a Default state
If you are Uninstalling Prepar3D v4 to fix an Issue you are having, maybe you could run a Repair and also delete the generated files to see if this solves your Issue
By following the 2 steps below you will return Prepar3D v4 back to a default state again, After you complete these steps, Launch Prepar3D and test
2 steps to return Prepar3D v4 back to a default state
Step 1 Run a Repair
Navigate to your Control Panel "programs and features" Right Click on Prepar3D v4 Academic \ Professional Click Change

The Modify Set up box will appear, Click Repair When the process has completed Restart your computer

Step 2 Delete the Generated Files
There is a file located in your Core Prepar3D v4 folder called Delete Generated Files, by double left clicking on this file the generated content from the 3 Prepar3D v4 folders in ProgramData, AppData and Roaming will be removed
Note: This process will disconnect your Add On's and all previously saved settings. When you launch Prepar3D these files and folders will generated again as default,
Please see here for a short video of this in motion
Navigate to your core Prepar3D v4 folder, Scroll down a bit, Double left Click on the file Delete Generated Files

By successfully following these 2 steps Prepar3D v4 will now be at a Default state, Launch Prepar3D and test to see if this has resolved your Issue
Back to the INDEX Click here
-
2) Updating Prepar3D v4 using the Update Component Installers
A Step by Step Guide to update Lockheed Martin's Prepar3D v4 using the Update Component Installers
This is the Same process as the previous version "v3" with the exception of Requiring to activate Prepar3D v3 again after a Client update.
------------
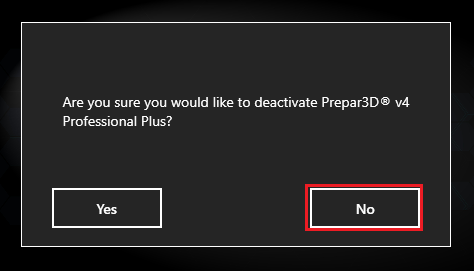
When minor updates are released for Prepar3D v4, there are two options available to update Prepar3D v4. The recommended method is simply updating using the Client installer. This is the quickest and least error prone. When you uninstall the Client, you will be prompted about whether or not you wish to deactivate Prepar3D. You can choose “No” if you are simply updating the same machine and, therefore, will not have to reactivate once the reinstall is finished.
You can also update by doing a complete uninstall and reinstall of the entire application, but often that is not necessary or desired
Note: You must have already installed the full Prepar3D v4 application in order to update just the client
----------------------------------
We have 3 Component Installers, Client, Content and SceneryThe Client component is all that is Required to update Prepar3D v4 to a more recent version
The Content and Scenery component's are Optional update's each of which may have additional changes with minor update's.
------
INDEX1) Updating Prepar3D v4 to a more recent version (Client update)
2) Confirming the Client update was successful
3) Actions to take after you update the Client
4) 3rd Party Software (Add On's) after a Client update
-----
5) Updating the Content component
6) Updating the Scenery component
7) Additional Information
Please Note: Insure you temporarily Disable your Antivirus Software and the User Account Control (UAC) before you begin the updating process-----------------------------------------------------------------
1) Updating Prepar3D v4 to a more recent version (Client update)
Note: You must Uninstall the existing Client first before you Install the new ClientTo uninstall the existing Client..........
Navigate to your Control Panel, Right Click on Prepar3D v4 Academic \ Professional Client, Click Uninstall
This box will appear, Click Yes to Uninstall the Client
You will now be given an option to "deactivate Prepar3D v4 or not "
If you are simply updating the Client, You can choose “No” Your Prepar3D license will stay active, therefore you will not have to reactivate once the update is finished.
Next, Sign into your Prepar3D Purchased Downloads fill out the Customer Account Information with your Email address and Account Password
Click the little + to expand the Component Installers.
The Client is a stand alone Installer, Click on Install_Client.msi to Download this file.
After the download has completed, Navigate to your PC Downloads
Right Click on the new Install_Client.msi Click Install

Go through the prompted steps to Install the new Client
-----------------------------------------------------------------
2) Confirming the Client update was successful
You can confirm a successful Client update by Launching Prepar3D v4
Click Help > About Lockheed Martin, Here you can confirm you have the most recent version of Prepar3D v4
By completing a Client update you have now updated Prepar3D v4 to a more recent version
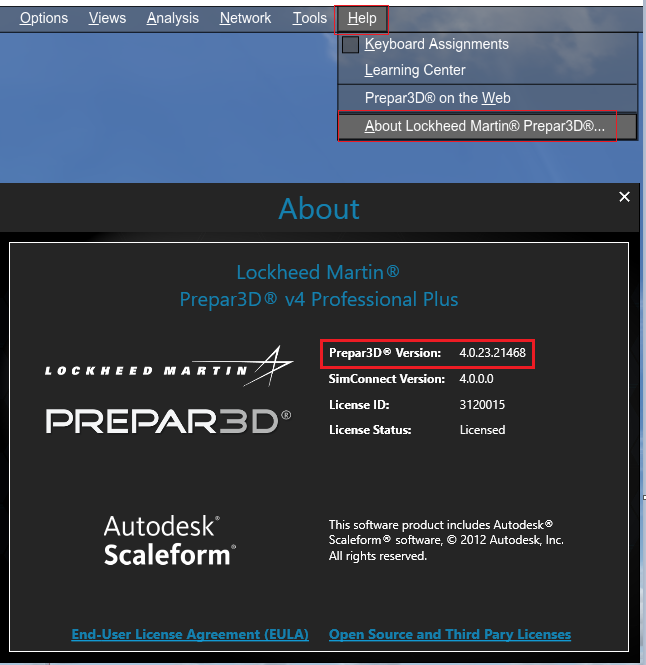
You can also check and confirm the Client version number in your Control Panel
-----------------------------------------------------------------
3) Actions to take after you update the Client
These actions are recommended but not required
Delete the Prepar3D.cfg file and the Shaders folder after you update with the Client
Note: This file and folder will generated again when you launch Prepar3D
These actions will not effect your 3rd Party Software (Add On's), You will need to readjust your graphic and scenery settings to your preference again via Prepar3D > Options after you delete the Prepar3D.cfg file
Right click and delete the Prepar3D.cfg file and the Shaders folder, These will generate again when you launch Prepar3D-----------
Local Disk (C:) ► Users ► You ► AppData ► Roaming ► Lockheed Martin ► Prepar3D v4 - Prepar3D.cfgLocal Disk (C:) ► Users ► You ► AppData ► Local ► Lockheed Martin ► Prepar3D v4 - Shaders
-----------To locate this file and folder, Insure the box is Ticked for Show hidden files, folders and drives in File Explorer Options
-----------------------------------------------------------------
4) 3rd Party Software (Add On's) after a Client update
Completing a Client Update will mostly effect Utilities like Active Sky Next, Active Sky 2016, FSUIPC, Flight1 GTN 750\650, SODE, Chaseplane, Orbx ObjectFlow and EZdok Just to name a few.
In most cases Software Developers will be releasing Updates to there Programs\Utilities to coincide with the release of a new Client update
Check the support forums for the "Add On" in question for news and updates
---------------------------------------------------------------------------------------------------------------
---------------------------------------------------------------------------------------------------------------
5) Updating the Content component
Note: Both the Content and Scenery component's are Optional Updates
You must Uninstall the existing Content component first before you Install the new Content
To uninstall the existing Content......
Navigate to your Control panel, Right Click on Prepar3D v4 Content, Click Uninstall
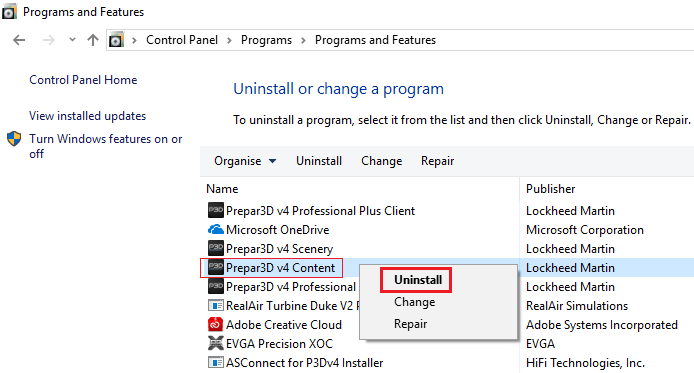
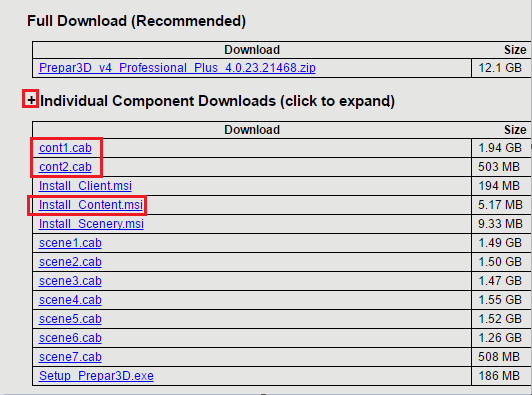
The Content component files are bigger in size (2.5 gig)
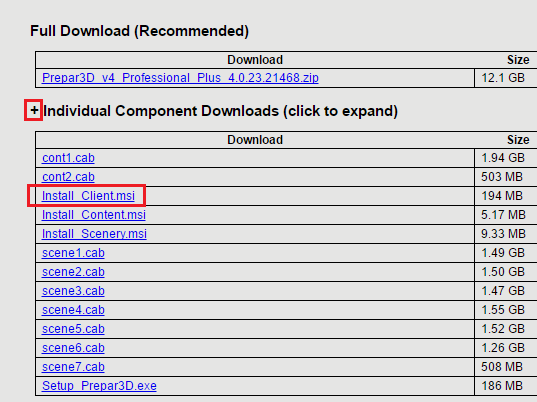
A Download Manager is Recommended to aid in a successful download
The following 3 files outlined in red are required to run the Content update. Click on each of the files to download, Cont1.cab, Cont2.cab, Install_Content.msi
After the download has completed, Navigate to your PC Downloads
Insure all 3 files are in the same folder (location)
Right Click on Install_Content.msi Click Install, Go through the prompted steps to Install the new Content update
You can confirm a successful Content update by checking the Content version number in your Control Panel
Note: Completing a Content Update will possible overwrite files like effects, Simobjects, sounds and textures that have been Modified by 3rd Party Software (Add On's)
For any questions you may have regarding a Content update please visit your 3rd party software support Forums
-----------------------------------------------------------------
6) Updating the Scenery component
Due to the size of the Scenery files, If you would also like to update the Scenery component as well as the Client and Content it is highly recommended to download the complete Prepar3D v4 file to your computer and then complete the updating process Use a Download Manager to download the complete Prepar3D v4 file to aid in a successful download
Click on the Prepar3D Academic \ Professional Link to download in full
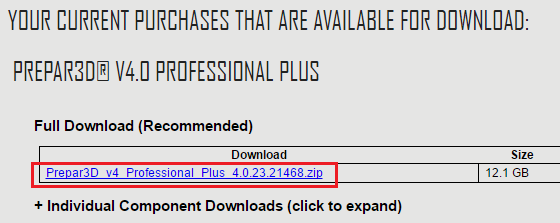
You need to Extract the Zipped folder Before you complete the update
Use a tool like 7zip to extract the Zipped folder, The 7zip tool will Inform you if your download has not completed successful
After you Extract the zipped file you will now have the complete Prepar3D v4 application downloaded to your PC
You can now Install the Scenery component by Right clicking on Install_Scenery.msi click Install
Note: After a Scenery update you will need to Reinstall Orbx Global Base Only
As you now have the full Prepar3D v4 file you can Install any of the component Installers by following the steps in this tutorial
-----------------------------------------------------------------
7) Additional Information
The 3 component Installers Client, Content and Scenery have a total of 18 yellow folders in your core Prepar3D v4 folder.
You can see below as to what folders are removed and updated during the update process
------------------
Install_ Client.msi - Licences, propdefs, Scaleform, ShadersHLSL, trinton
Install_ Content.msi - Scripts, redist, SimObjects, Weather, Scenarios, Ecosystem, Fonts, Autogen, Effects, gauges, Sound, Texture
Install_ Scenery.msi - Scenery
-------------------If you encounter problems, the recommended method of support is posting on the Prepar3D Forums
Back to the INDEX Click here
-
1
-
-
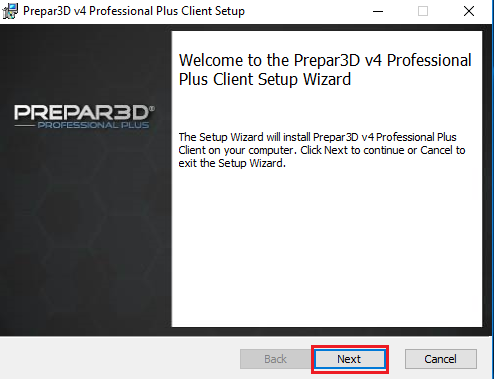
1) Downloading and Installing Prepar3D v4
A Step by Step Guide to Download and Install Lockheed Martin's Prepar3D v4
----------
These directions are intended for use when downloading and installing the Prepar3D v4 application on Windows 7, Windows 8, or Windows 10 operating systems. Prepar3D v4 is not compatible with Windows XP and is not recommended on Windows Vista. A video card with full DirectX 11 support is required.
If you encounter problems, the recommended method of support is posting on the Prepar3D forums
Click here for the Prepar3D system requirements http://www.prepar3d.com/system-requirements/
Please Note: Insure you fully update your windows operating system. This should include running Windows Update and updating any drivers to the newest version
---------------------------------------------------------
There is 5 Guidelines to follow for a Successful Download and Install(1) Download Manager: Use a Download Manager to Download Prepar3D v4 to aid in a successful download
(2) Anti Virus Software: Temporarily Disable all Antivirus Software before you run the Installer
(3) User Account Control: Disabling UAC from possibly disrupting the Install process
(4) Extracting: Extracting the Zipped Download folder using a suitable extract Tool
(5) Administrator: Running the Prepar3D v4 Installer as administrator
---------------------------
-----
INDEX
-----I) Accessing your Prepar3D Download after you Purchase
II) Downloading Prepar3D v4
III) Temporarily Disabling Antivirus software
IV) Disabling User Account Control (UAC)
V) Extracting the Zipped Prepar3D v4 Download folder
VI) Installing Prepar3D v4
VII) Activating Prepar3D v4
VIII) First Flight (Confirming a good Install)
IX) Additional Information
--------------------------------------------------------------I) Accessing your Prepar3D v4 download after you purchase
After purchasing Prepar3D, you should have received an invoice that included a link to the Prepar3D software download site. Open your invoice and click the Software Download Page link or click Downloads from the Prepar3D website (http://www.prepar3d.com/purchased_downloads). With the Downloads page loaded, you will need to enter the license information found in your invoice.
On the right side of the page, enter your license ID and license password (under “Description” in your invoice), and hit submit. Once inside your Account Click on the Prepar3D link to Download the complete file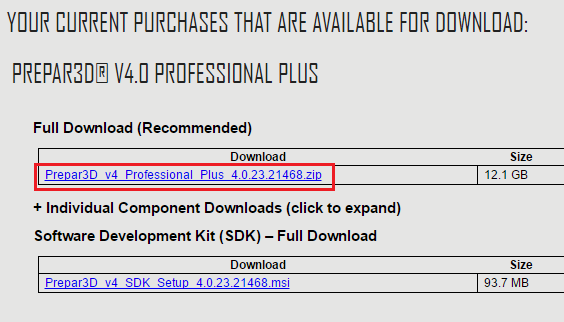
--------------------
II) Downloading Prepar3D v4
Use a Download Manager to Download Prepar3D. A Download Manager will aid in a successful download
Note If you are experiencing Issues Downloading Prepar3D please see This Link
--------------------
III) Disabling Anti virus software
Temporarily Disable all Antivirus Software Before you Run the Prepar3D Installer, Your Antivirus Software may see Prepar3D as a False Positive and disrupt the Install Process.
--------------------
IV) Disabling User Account Control (UAC)
Disable your UAC User Account Control l from possibly disrupting the Install Process. Type UAC in your windows search bar. Click Never notify and Click Ok
--------------------
V) Extracting the Zipped Prepar3D v4 folder (Important)
You need to Extract the Zipped folder Before you run the Installer.
Use a tool like 7zip to extract the Zipped folder, The 7zip tool will Inform you if your download has not completed successful
Note: If you receive errors when extracting the zipped folder please see This Link
--------------------
VI) Installing Prepar3D v4
Note: You will need at least 27 gig of Hard Drive space with an additional 13 gig on your Operating System (C Drive) to Install Prepar3D v4
The recommended method to Install Prepar3D is by right clicking on Setup_Prepar3D.exe and Run as administrator
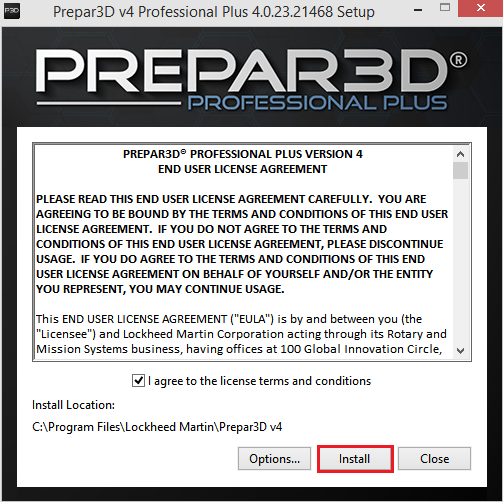
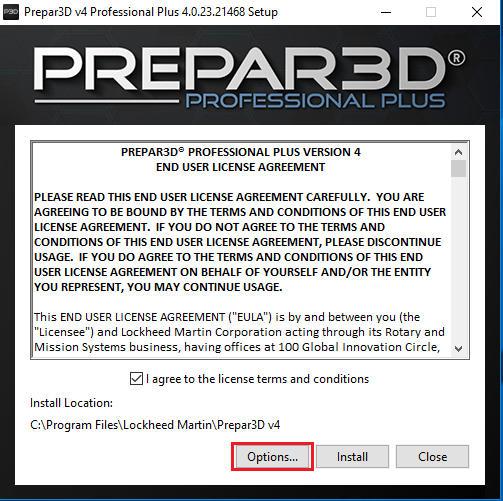
During the Install process you will have the Option to Install Prepar3D to a different location, You can achieve this by clicking Options and Create and Name a New Folder and Install Prepar3D to the location of your choice
For Example: C\Prepar3D v4...D\Prepar3D v4...E\Prepar3D v4...
Read the EULA and click the checkbox next to “I agree to the license terms and conditions.” This will enable the Install button Click Install
The installation can take anywhere from five minutes to an hour depending on your computer
--------------------
A second method of Installing Prepar3D is by running the Component Installers Individually, Client, Content and Scenery.
This is recommended Only for advanced users
Navigate to your Prepar3D Downloaded folder
In this order (Important)
1) Right Click on Install_Client.msi Click Install
2) Right Click and Install_Content.msi Click Install
3) Right Click and Install_Scenery.msi Click Install
If you Install Prepar3D v4 by running the component Installer Individually, Please Insure you have the latest Microsoft Visuals 2015 and NET Framework 4.6.2 Installed
Download Microsoft Visuals 2015 x86 & x64 , Run the Installer as administrator, Restart your computer
Download Microsoft .NET Framework 4.6.2 , Run the Installer as administrator, Restart your computer
Note: If you are experiencing Issues Installing Prepar3D please see This Link
--------------------
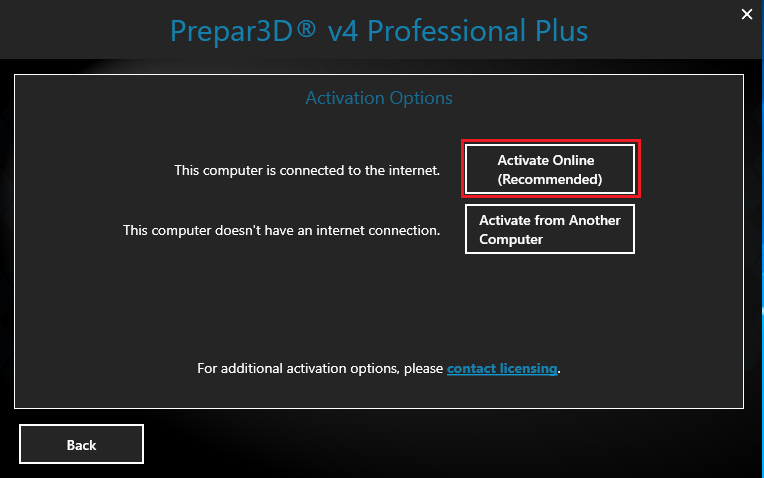
VII) Activating Prepar3D v4
You will now have a Prepar3D Icon on your desktop, Right Click and run as administrator
Prepar3D must be activated before use. You will automatically be prompted to enter your license information during first execution. You are able to activate online, through another computer, or through email. More information can be found in the Learning Center (located in your install directory as Learning Center.chm) under Prepar3D Product > Activate Prepar3D > How to Activate Prepar3D.
If there are any issues with your license, please contact licensing@prepar3d.com
Activating Prepar3D Online is recommended
Note: If you are experiencing Issues Activating Prepar3D please see This Link
--------------------
VIII) First Flight (Confirming a good Install)
Insuring the Install Process has been successful.....
Before you Install any 3rd Party Software (Ad On's), Launch Prepar3D, Pick your Airport or Location and Plane of choice, complete a quick flight and Insure everything is working and you have no Problems, Issues encountered at this stage are quicker to Troubleshot and Diagnose.
--------------------------------------------
IX) Additional Information
1) If you encounter problems, the recommended method of support is posting on the Prepar3D forums
----
2) Antivirus Software (Excluding the Prepar3D.exe)
It is recommended to add the Prepar3D.exe from Inside your core Prepar3D folder to the Exclusions Zone of your Antivirus Software, This will Insure Prepar3D is not quarantined as a false positive
-----
3) Running Prepar3D as administrator
Insure you run Prepar3D as Administrator to allow for administrator privileges
-----
4) Diagnosing and reporting Issue's
The link provides General Debugging Steps / How to Post Issue Reports
-----5) Frequently Asked Questions
The link provides a list of Frequently Asked Questions If your question is not answered here, feel free to ask it on our Support Forums
-----
6) Activation Issues
Please e-mail licensing@prepar3d.com with a very brief explanation of the reason you need your license reactivated, along with your license ID and invoice number, and we will be happy to get you squared away in under two business days
Back to the INDEX Click here
-
Hello Sethos
Regarding Orbx products......
Client: Updating the Client will require no further action really, Just launch the FTX Control Panel, this action will check and verify the files
-----------
Content: Updating the Content component will require you to do 2 things
1) Force an update of the "Orbxlibs" by Deleting the version text file located below, it will look like this FTX_AA_ORBXLIBS.TXT
Prepar3D v4 ► ORBX ► User Documents ► Versions ► FTX_AA_ORBXLIBS.TXT
Launch the FTX Central control panel, this action will prompt you to reinstall\update Orbxlibs, Click the blue box (Bottom left corner)
2) Run the Migration Troubleshooter to Insure the Integrity of the Orbx Files, at the location below
Prepar3D v4 ► ORBX ► Troubleshooter ► Migration Troubleshooter.exe
-----------
Scenery: Updating the Scenery update will require you to Reinstall Orbx Global Base. FTX trees does also overwrite default files but the FTX control Panel should verify these when launched. As FTX trees is only a small download there is no harm to run the download again anyway
Also carry out step 1 and 2 from the above, Force an Orbx libraries update and run the Migration Troubleshooter.exe
----------------------------
For more on this scroll down to INDEX 3 in the link below
-
2
-
 4
4
-
-
Introduction
The 13 Topics below are Tutorials to help you Install \ Update \ Uninstall and Troubleshoot these actions of Lockheed Martin's Prepar3D
I have also Included basic troubleshooting steps for FTX Orbx scenery after Updating or Reinstalling Prepar3D
INDEX 1 Here we discuss Prepar3D Only : Downloading & Installing, Updating Prepar3D using the update component Installers and Uninstalling Prepar3D
INDEX 2 Prepar3D problems with : Purchasing, Downloading, Installing or Activating Prepar3D
INDEX 3 Here we discuss FTX Orbx Scenery and steps to take after updating or reinstalling Prepar3D and basic troubleshooting steps Included
-------------------------------------
INDEX 1
Downloading & Installing, Updating and Uninstalling Prepar3D
1) Downloading and Installing Prepar3D v4
2) Updating Prepar3D v4 using the Update Component Installers Click here
3) Uninstalling\Deactivating Prepar3D v4 Click here
-------------------------------------------
INDEX 2
Problems: Purchasing, Downloading, Installing or Activating Prepar3D
1) Unable to Purchase Prepar3D, "This Site can't be reached" Click here
2) Downloading Problems, Install errors, Confirming the MD5 Checksum Click here
3) Installing Problems, Prepar3D will not Install Click here
4) Problems Activating Prepar3D Click here
-------------------------------------------
INDEX 3
FTX Orbx Scenery and Updating or Reinstalling Prepar3D
1) Updating Prepar3D, Steps to take after Click here
2) Reinstalling Prepar3D, Steps to take after Click here
Troubleshooting steps
3) The Migration Troubleshooter.exe (Missing files) Click here
4) Problems with Scenery anomalies Click here
- Correct Scenery order for Orbx
- Missing airports in FTX Central
- Elevation Issues, Black Water
- Disabling non compatible Scenery
- Tree colours are different
- Inverted \ vertical waves
- Reinstalling the Orbx Libraries
5) Still having problems ? (Refreshing the Orbx Scenery) Click here
- CTD (Crash to Desktop)
- Blurriness, Scenery catch up
- Water on land
- Excessive loading times
- Scenery.cfg error
6) Last resort (Refreshing Prepar3D and Orbx Scenery) Click here
-
5
-
3
-
I will put a proper Tutorial with Images together in the coming days but below is just a quick 5 step guide
Some basic steps to Download and Install Prepar3D v4, In this order (Same as v3)
First, Insure you have at Least 12 gigs of free space on your C-Drive Operating System, You can Install v4 on any Drive you like but you will still need this extra space for the Repair Installers on your C-Drive
1) Use a Download Manager to download the v4 file, They are free and will aid in a successful download
2) Use a proper Extract tool to Extract the Zipped folder, Something like 7zip, Its free and this tool will tell you if your download is bad
3) Add the Prepar3D_Setup.exe from inside your download folder to your Exclusions Zone of your Antivirus Software (Important)
4) Disable UAC (User Account Control) Drag down to Never Notify
5) Right Click on Prepar3D_Setup.exe and Run as administrator
If you intend to Install 3rd Party Software (Add On's) for Prepar3D v4, You will be best to Install Outside of the default Install Location "Program Files"
You can Click Options during the Install process, Create and Name a folder and Install v4 there
(Insure you have enough space to Install v4 in this location)
Updated Link below for Install tutorial
-
Yes Jack as Michael said
Its a Panic button when everything else fails, Only to be used as a last resort
================================
On a side Note:
The prepar3D.com site and Forums is down and prepar3Ding for the v4 released
")
-
1
-
-
On 5/29/2017 at 3:43 AM, Bills511 said:
As for the deleting generated files feature, I understand the function but when it disables 3rd party add-ons what action is needed to re-enable them?
Hello Bill
After you use the function delete generated files, as you know it will disconnect your Add On's (Not uninstall them, just disconnects) To connect back up your Add On's it will depend on what you have currently Installed.
After you use the new function delete generated files, You need to first Launch Prepar3D v4 and then close it down, This will generate your .cfg files back to default again, You only need to close Prepar3D if you are following the steps below. If you have no Add On's Installed and have used this function for what ever reason (Prepar3D v4 wont launch after Installing) you do not need to close Prepar3D, Just launch and fly
==============================
Scenery
Orbx Scenery Launch your FTX Control Panel, wait maybe 10\15 seconds this will Automatically Insert your Orbx entries into the relevant .cfg files
Orbx Object Flow Run the Object Flow Updater again.
Other Scenery You will need to either run the Installer again Or manually add the entries back through your Prepar3D > Scenery library, By clicking Add Area and Browsing to the scenery install location and adding it that way (To be honest I just run the Installer again, its quicker and its full proof)
================
Utilizes
Utilizes like Active Sky Next\2016, Percipitfx, and EZdok, Anything with a Control Panel, Just Launch it and it will Insert back the entries into your dll.xml and exe.xml files.
Utilizes like SODE and FSUIPC you can just run the Installer again
=================
Aircraft
Any Aircraft that Installs an entry into your dll.xml or exe.xml file's , Just run the Installer again
Note: Some folks back up all there folders and .cfg files before they delete them and then Paste them back in again afterwards, If you have gone to the trouble of Removing all the generated folders because of a big Issue you are having, Well then this is Not advisable to do as the Issue could be in one of them folders.
-
19 minutes ago, volkira said:
So to be clear will all add on scenery now be placed within the add on folder in Documents?
Hello
Going forward....
That will depend on the 3rd Party Software developers and how they shape there Installers
-
Updated
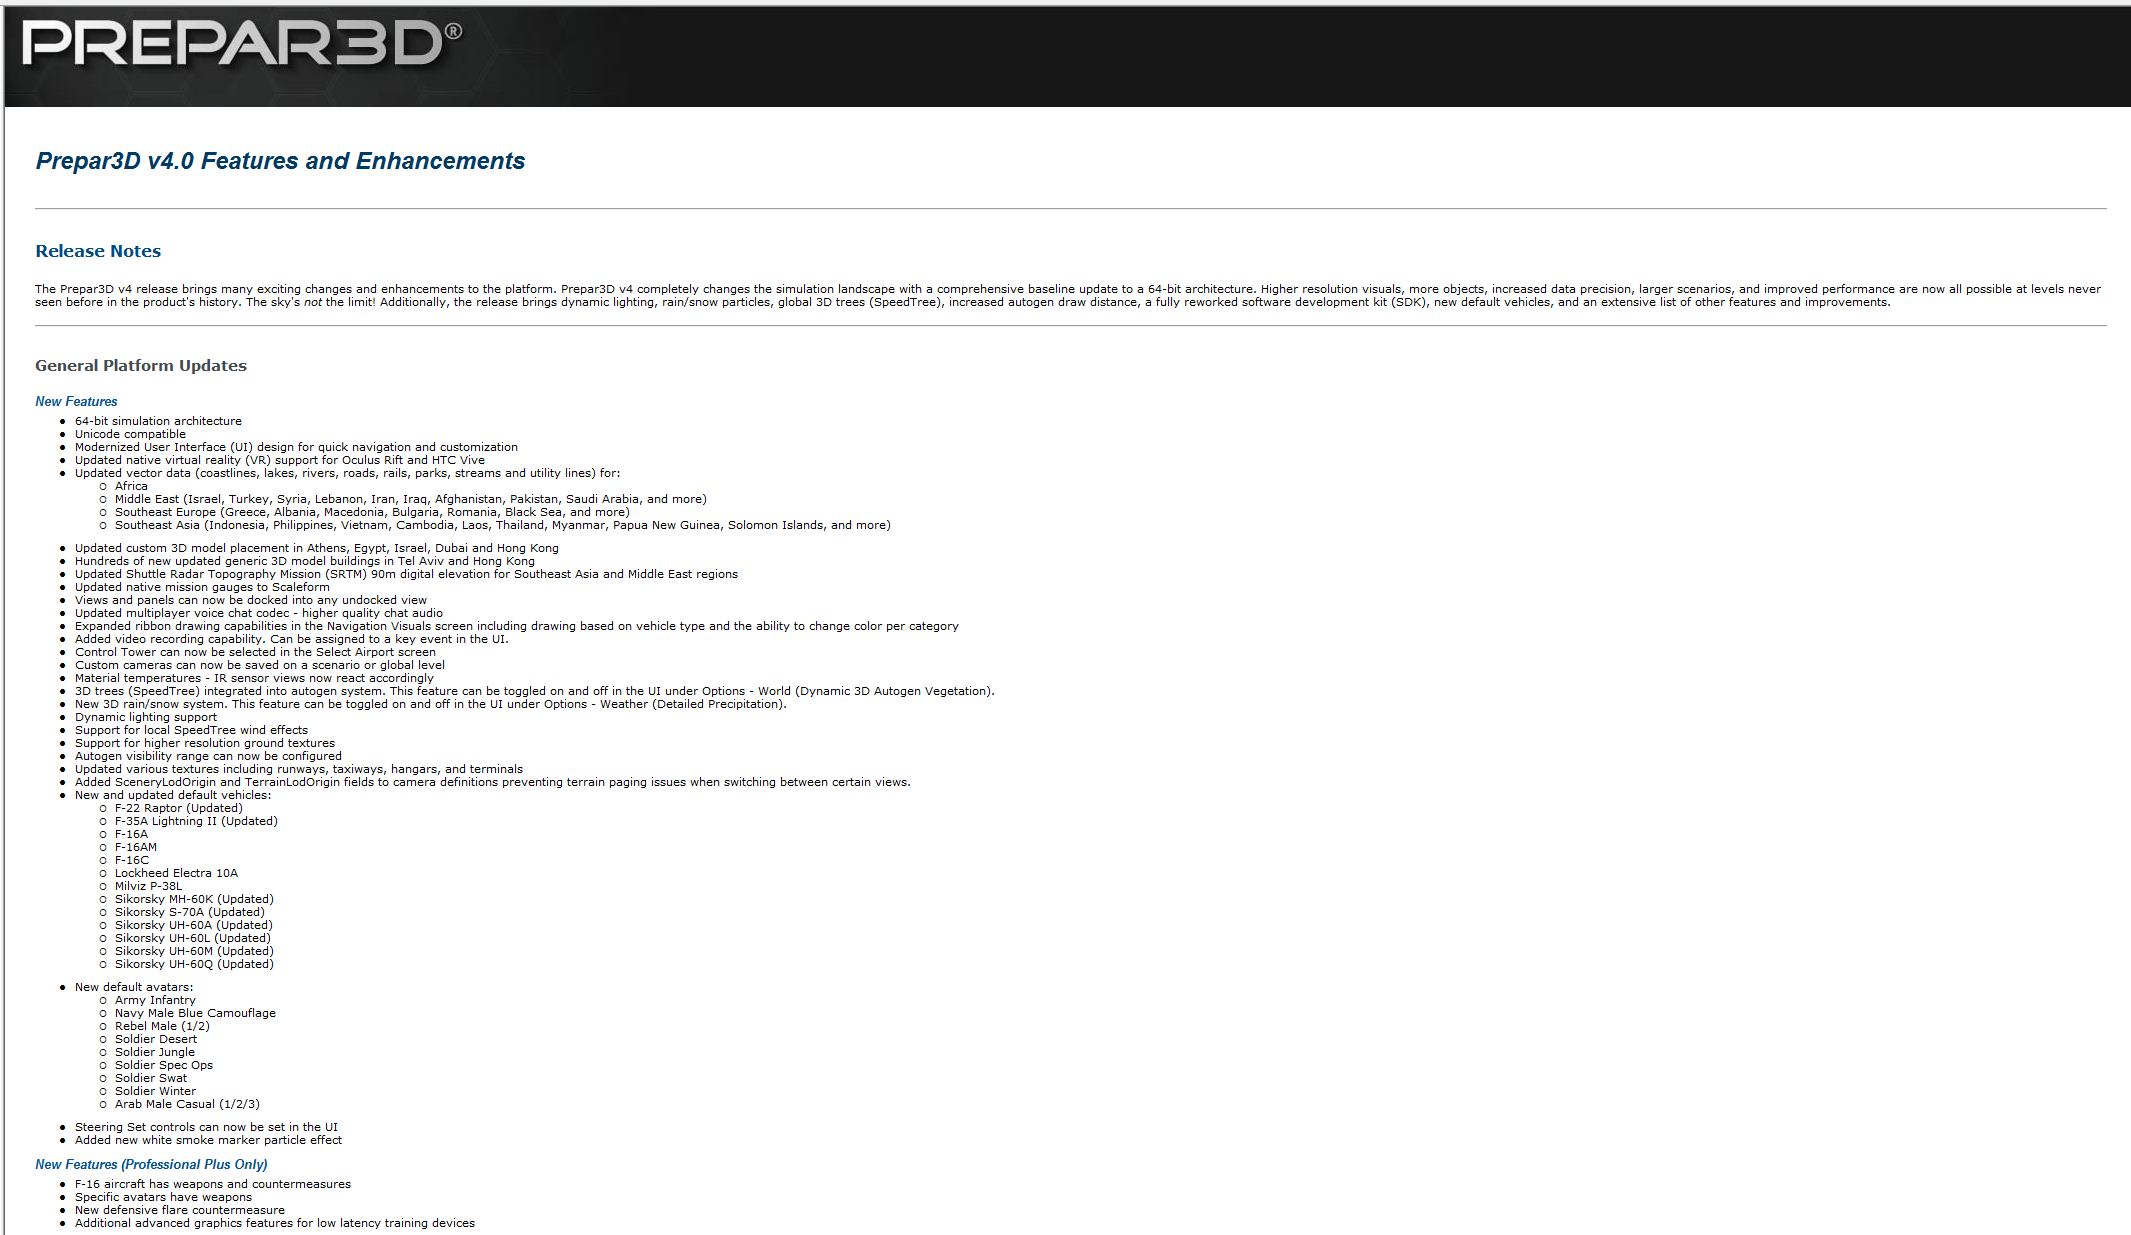
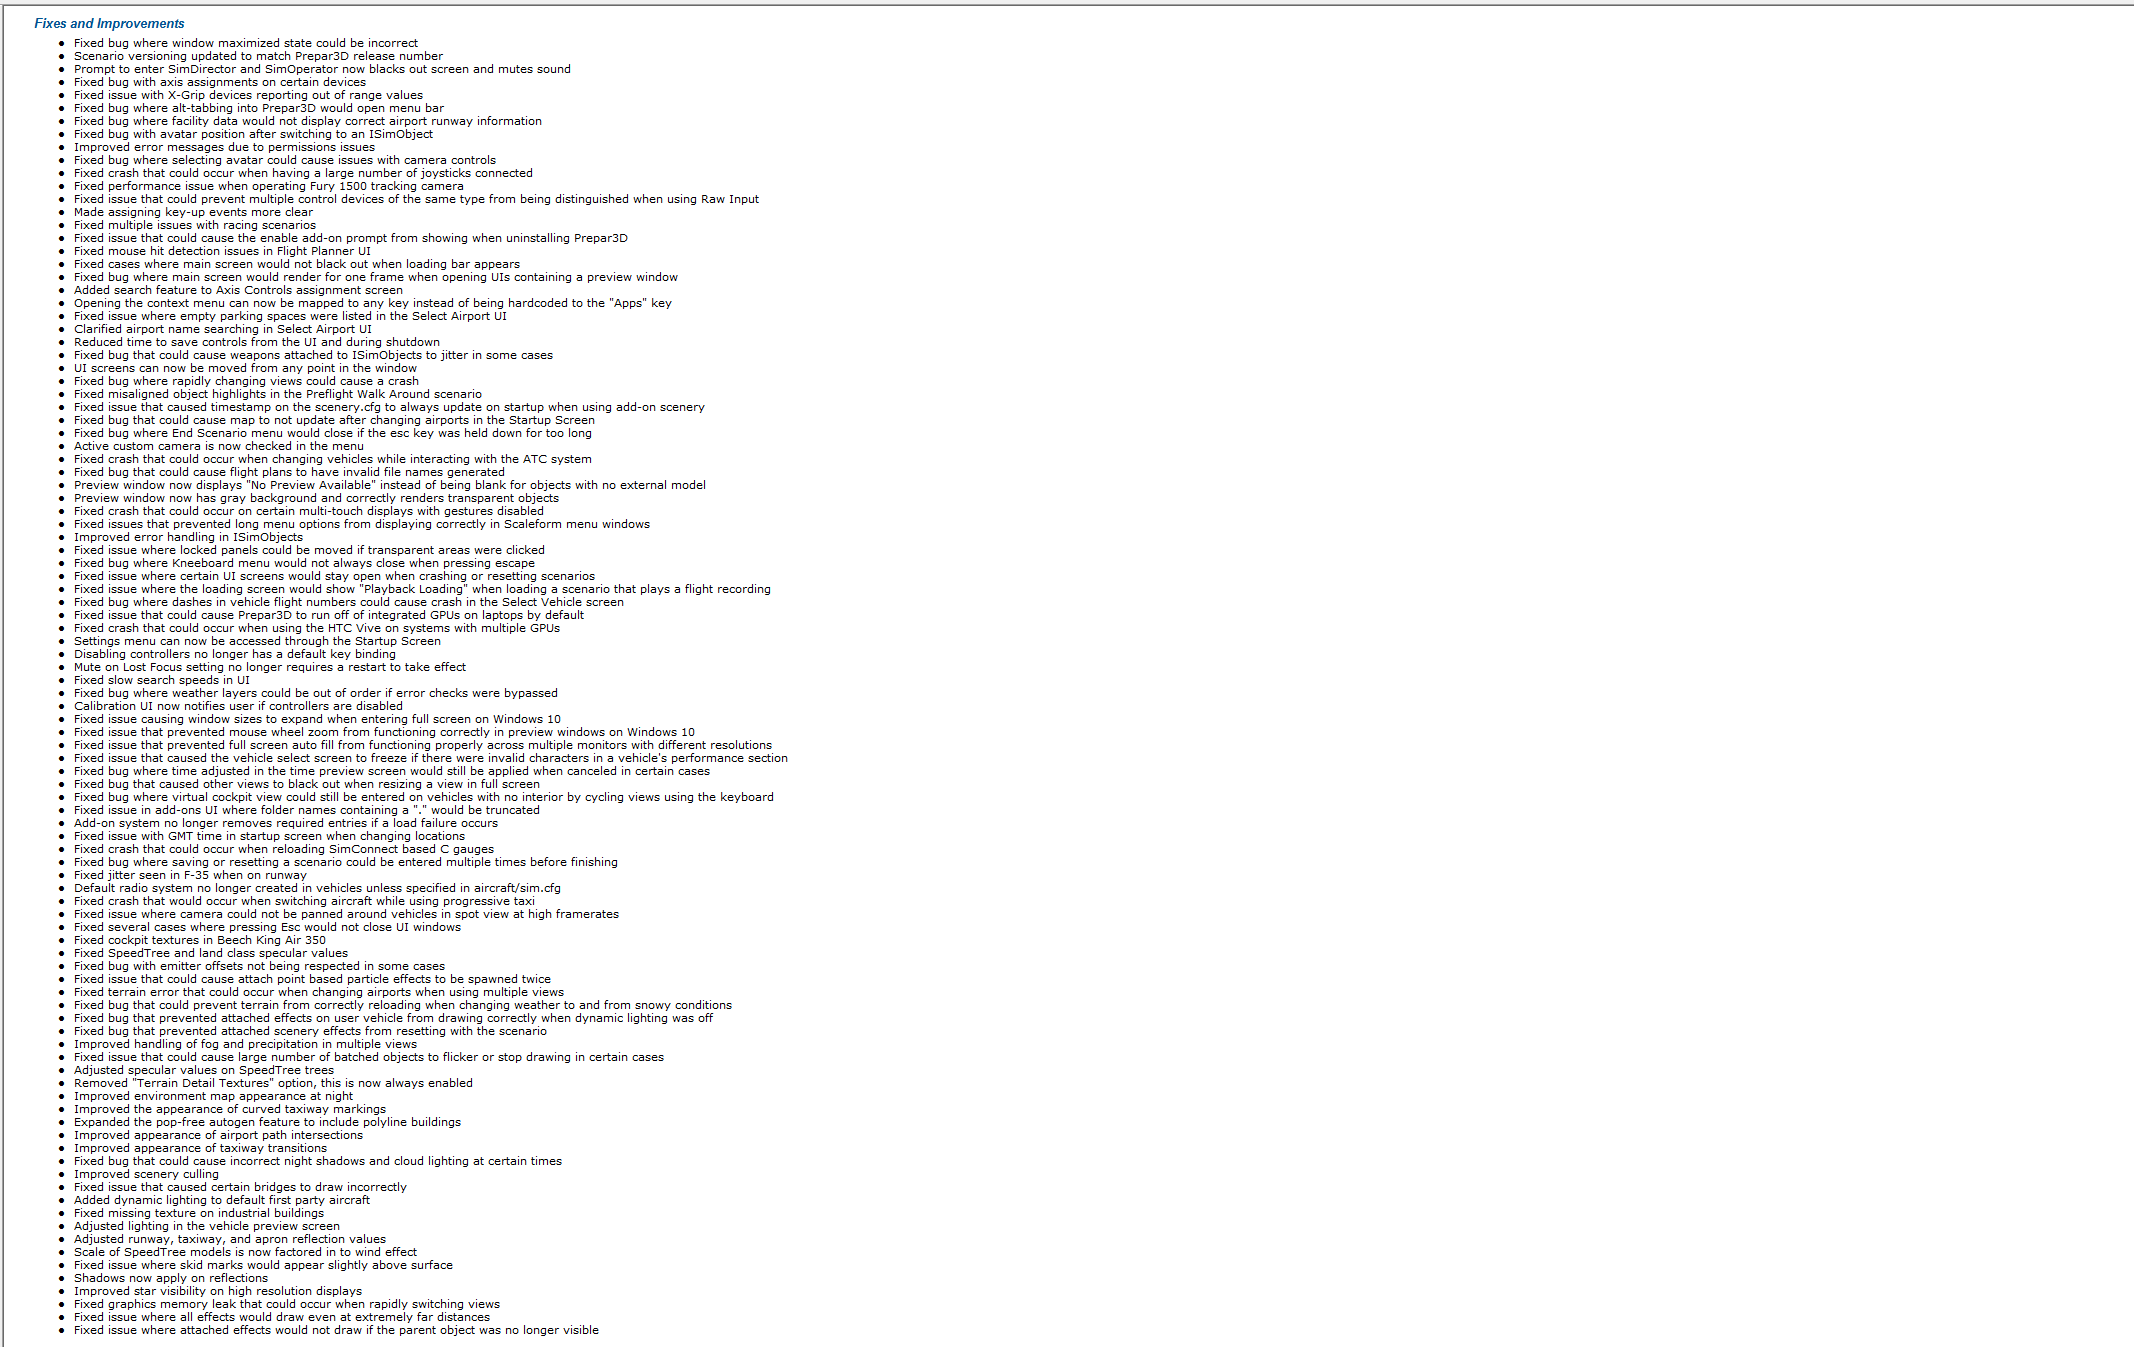
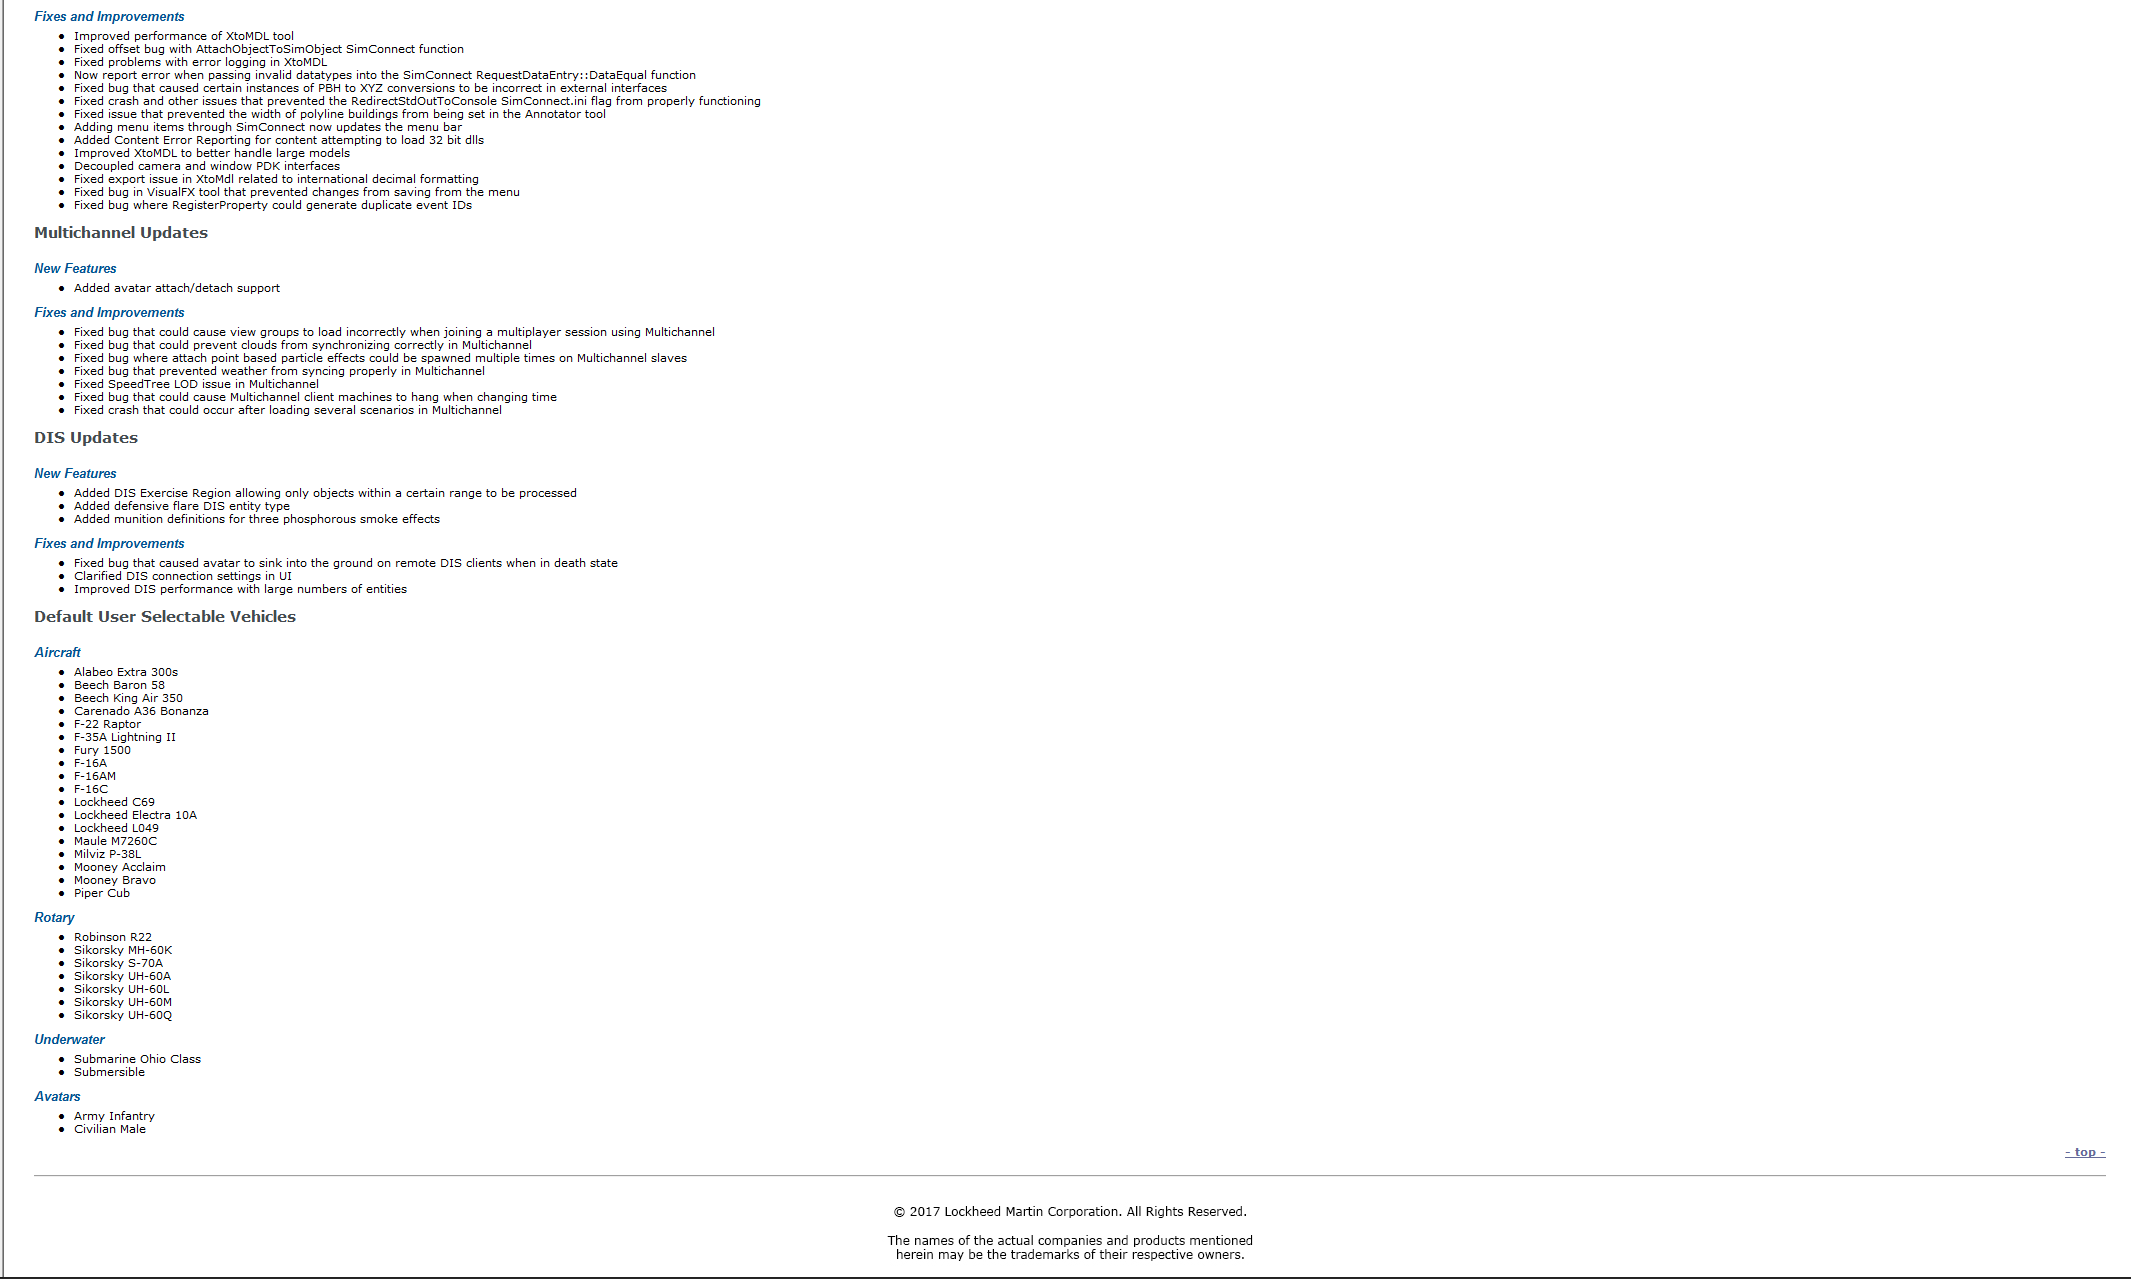
Prepar3D v4 features and enhancements

-
1 hour ago, Jack Sawyer said:
If I could hazard a guess I wonder if it'll be like I have now, I run FTX and I get two selections, FSX (which I never ever use) and P3D.
So would I now have three? FSX, P3D 3, and P3D 4? Who knows?
Yes Jack spot on.
The updated FTX central will have some seriously nice Wizardry going on under the hood to get you up and running in V4 quickly to enjoy them smooth and wonderful Orbx Scenery's
-
2
-
-
On 2017-5-25 at 8:53 AM, jjaycee1 said:
I would like to know when you intend to give us an insight into some more details of the list of planes that are included
Hello
Some of the Planes have had an Update alright, The extra planes Include several variations of the Lockheed F-16 and the Lockheed Electra
Lockheed Electra


Lockheed F-16


-
2
-
-
-
17 hours ago, Jack Sawyer said:
Will I be able to have version 3.4 and 4 on the same PC?
Hello Jack,
Michael's answer is spot on
7 hours ago, FireRx said:Verifiing we can still install prepar3d v4 in a separate SSD drive, right. I can still change where I want to install it?
Hello,
Yes you can install Prepar3D v4 in what ever location you like by clicking Options and choosing your Install location
-
2
-


")
Prepar3D v4 Tutorials and Orbx Troubleshooting
in Prepar3D
Posted
6) Last resort (Refreshing Prepar3D and Orbx Scenery)
If you have followed the above steps and you are still experiencing Issues we can now Refresh Prepar3D by removing all 3 generated folders, These folders are called generated folders meaning if you delete these folders they will generate again as default when you launch Prepar3D.
--------------
Please Note:
1) The following process will temporarily disable all your Add On's from Prepar3D, it will not uninstall these Add On's it will just disable them by removing the launch entries in the .cfg files (generated folders)
2) This will Not effect any of your Add On's using the add-on.xml file method. When you launch Prepar3D a small black window will appear prompting you an Option to "Enable" these add On's. Click here for an example
---------------------
Follow the steps in this order
Removing the generated folders
There is a file located in your Core Prepar3D v4 folder called Delete Generated Files, by double left clicking on this file the generated content from the 3 Prepar3D v4 folders in ProgramData, AppData and Roaming will be removed (deleted)
When you launch Prepar3D these folders will generated again as default returning Prepar3D back to a close default state
Navigate to your core Prepar3D v4 folder, Scroll down a bit, Double left Click on the file Delete Generated Files
A small black window will briefly appear and then automatically close again
After you have completed this step Launch Prepar3D to the Scenario screen (first screen) and then Close down Prepar3D
By launching Prepar3D these folders will generate again as default
Note: When you launch Prepar3D you will be prompted an option to "Enable add-on Orbx Object Flow" Click Yes
--------------------------------
Activating the FTX Orbx Scenery
By simply Launching the FTX Central Control Panel this action alone will Activate all of your Orbx Scenery again
Launch FTX Central and wait until you see a message on the bottom left of the screen "Activating Orbx scenery" this normally takes about 10 \ 15 seconds
You can now Close FTX Central
After you have completed the above steps Launch Prepar3D and test to see if your Issue has now been resolved
---------------------------------------------
Additional Notes:
Back to the INDEX Click here